
Sprinklers and boat house pump
updated September 2015
(Further updates are required as none of the system is working, following the construction of the new cabin.)
The setup has changed significantly. There is a new pump which is not connected. The old pump still works. There is a new pressure tank. All the valves but the lake valve still work and are shown correctly. The lake valve may or may not be there. Priming will be different.
There is a new strainer and foot valve where the junction in the water used to be. It is two feet east of the dock pylon and about a foot north. See marking on wall of boat house. In 2013, this pickup was not protected by a screen and sucked up some rocks. These made it all the way to the pump, which was then rebuilt.
The irrigation lines to the back of the property were dug up when the septic was replaced. These have not been replaced yet.
- Turn off pump motor switch above pump.
- Open all six sprinklers. There are valves below each sprinkler. There are four sprinklers in the backside lawn, and two on the lake side. (Valves are normally open so no action may be required. OW is "open for winter")
- Put away any portable sprinklers that may be connected to the circuits. Drain hoses.
- Open all drain valves:
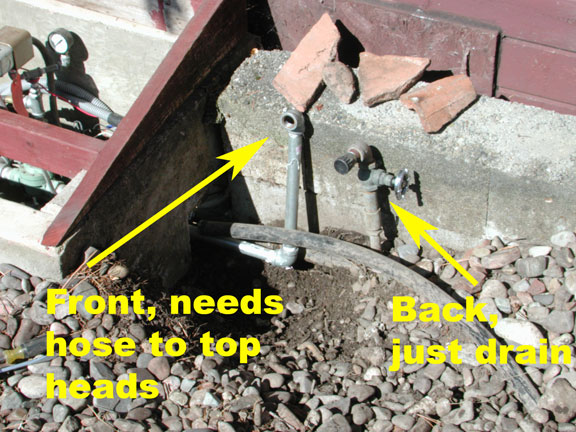
(The left spigot is connected to a separate timer and goes only here. It can be used to power the front two front yard sprinkler heads by running a hose to the upper head. The right spigot is only a drain for the circuit that powers the backyard four sprinkler heads.)
- next to pump house
- The Lake Valve does not exist any longer.
- The hose that supplies water from the lake must be removed, drained, coiled and stored. It has a foot valve, one way, that is used to prime the hose, see spring setup. (This arrangement may change.)
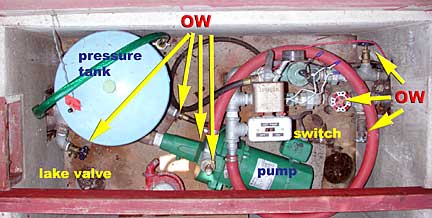
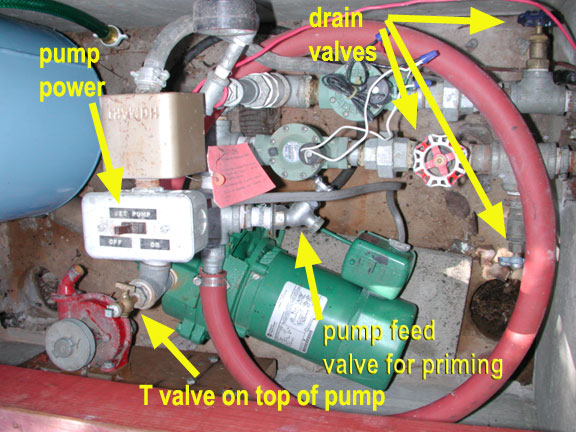
- In pump house, open three valves on the right. The red and white valve may already be open.
- Remove black hose from bottom of pressure tank.
- Remove drain plug from bottom of pump housing. Open T valve.
- Turn timer ON to station one and four, for one minute to drain each electrical valve. Turn lever to on and rotate time pointer connected to station index, to position one for a minute and to four for a minute.
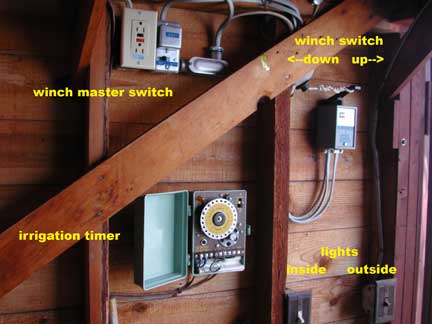
- Turn irrigation timer OFF.
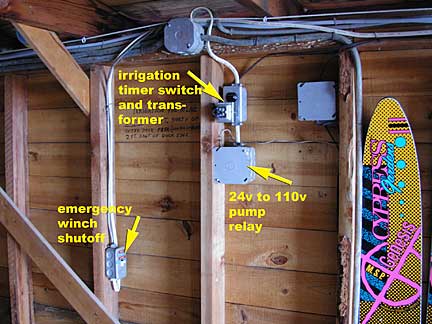
- Turn off power to transformer, at irrigation timer switch, above transformer.
Prepare for Spring
Sprinklers and boat house pump
- Turn on irrigation timer power, noisy transformer, in interior of boat house.
- Turn on timer, near boat house door. Set the timer to run the front sprinklers by pointing the arrow towards 5 o'clock position. You should hear a click that indicates the relay has turned on the pump. The pump will not actually turn on because the switch in the pump house is not on.
- Reconnect hose to bottom of pressure tank.
- Replace drain plug in bottom of pump.
- Run 1 1/4 diameter water supply hose from pump to the lake. Run the hose through the angle metal that reinforces the dock surface and submerge the end with the foot valve and strainer basket. The basket can be tied to the base of the dock piling.
- Run a garden hose from the spigot on the side of the cabin to the pump house. Push the hose inside the water supply hose from the lake until it is past the highest point. The objective is to fill the water supply hose with water as much as possible.
- Attach the water supply hose to the pump.
- Close T valve fitting at top of pump.
- Attach a short hose to the left spigot next to the pump hose on the right. This will normally feed the front sprinklers.
- Turn on pump switch above pump. Pump will start and will spurt some water. Continue to run pump as long as water spurts out of short hose attached the the left spigot. This takes a minute or so before a strong steady stream of water will come out of the short green hose.
- If water slows and there are not frequent spurts of water coming out of the green house, repeat step six. See also alternative below.
- Once water flows steadily and strongly.
- Close drain valves to sprinklers, see above.
- Test irrigation sprinklers to make sure they cover the area and do not stick in position. There are two circuits, front and rear. The valve closest to the boat house controls the garage side sprinklers and the valve with the red and white valve control the lake side sprinklers. The lake side sprinklers need to be connected from the hose bib just to the right of the pump house to the sprinkler head next to the southwest corner of the cabin.
- Note: The lake side sprinklers can be supplied with either the well pump or the lake pump. The red and white valve needs to be open and the valve under the house, next to the controlled sprinkler valve needs to be closed in order to use the lake water pump. The red and white valve needs to be closed and the controlled valve under the house needs to be open in order to use the well pump to irrigate the lake side lawn. This is not a normal method of operation but can be used to use up water from the well that might have a bad taste.
A better configuration for the water pick up from the lake needs to be designed. The old water pick up hose does not work and makes the pump difficult to prime because there is no foot valve. Perhaps a good design will place a foot valve at the water level. The priming can allow water to run to down the hose to the water level, leaving very little air in the system. In order to winterize, the foot valve needs to be removed, allowing the water to drain out of the supply hose. Even better might be to find a foot valve that can be drained on demand.