
Operations
October 2018
Notes about the cabin and how the various parts function.
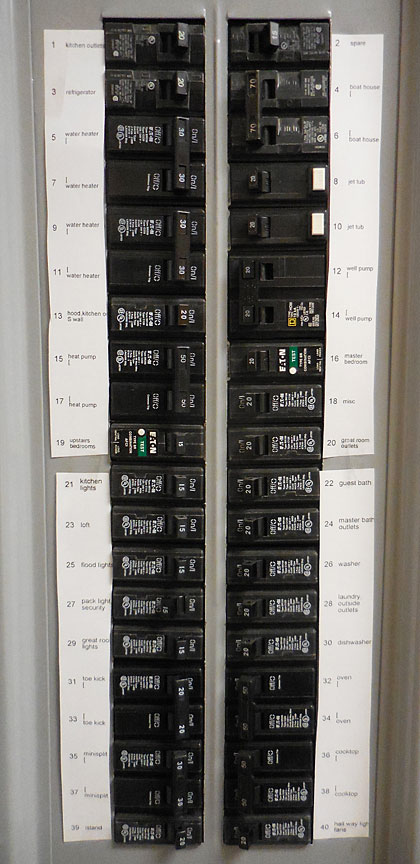
This is the main breaker panel inside the house. Not shown is a 200 amp breaker at the top which turns off all the electricity to the panel.

This is the main power distribution panel outside the wall on the garage, next to the power pole. It can turn off all the electricity, everywhere. See more about this panel in the garage.
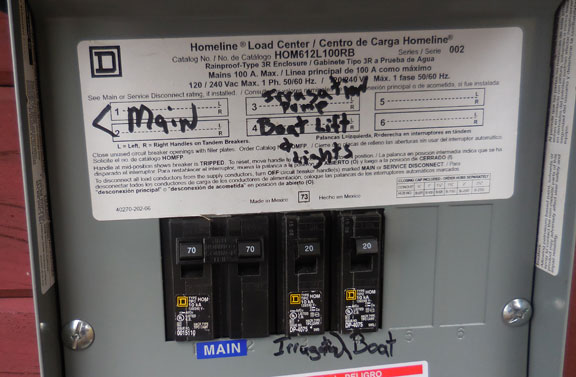
This is the boathouse panel. Read more about it in the boathouse section. The 70 amp breakers turn off the 220 v to the panel. There is also a breaker in the main house that turns off power to the boathouse.
Electrical
CAUTION: Never turn on the water heater breakers, 5, 7, 9, and 11, unless there is water in the tank. Turn on the hot water at a faucet, make sure the water is flowing, before turning on the breakers for hot water. Failure to make sure the water is in the tank will result in the heating element burning up. There are extra elements on top of the water heaters just in case.
CAUTION: Do not turn on the well pump, 12, 14, after the cabin has been winterized. The well will fill the pipes with water and water may continue to run if a valve was left open.
Breaker Panel
The breaker panel is just inside the West entrance door. During the summer all breakers are on except the wall pack light, breaker number 27.
During the winter all breakers are off except the following:
- 15 and 17 heat pump
- 27 pack light for security lighting on the street side of the house, turns on at dusk and off at dawn automatically
- 31 and 33 toe kick heaters
- 35 and 37 mini split wall units
- 16 master bedroom was left on because there are two lights controlled by a timer to make the house look occupied.
Switches
There are a lot of switches. Some function and some do not. There are lights outside without bulbs and so the switch will work someday, once all the fixtures are installed.
All lights should be off in the winter. There are two lights on a timer in the master bedroom. The timer is set to turn on the lights shortly before dusk and off around 11:00pm. Hopefully they will retain their settings and the correct time even in the event of a power failure.
Lights
There is a light in the crawl space on the left as you descend the ladder.
The pack light security light is controlled at the breaker panel, number 27. It is controlled by a light sensor, coming on at dusk and off at dawn.
Some of the security lights do not have bulbs yet.
The half bath, mechanical room, and pantry do not have light fixtures yet.
Outlets
Many outlets are ground fault protected. Look for the tiny light in the bottom right corner. There are other outlets near the GFI protected outlets that are also protected, in the master bathroom and kitchen.
The two exterior outlets on the back deck do not work.
Heating and Ventilation
Toe Kick Heaters
There is a toe kick heater in each of the bathrooms. The thermostat is on the wall. The thermostat can be set to OFF by rotating all the way counter-clockwise. The lowest setting is 40F. For winter they are set to 45F. These heaters are to insure the plumbing does not freeze in the winter. They are not the primary source of heat.
Ceiling Fans
There are four ceiling fans, one in the master bedroom, one in the guest bedroom, and two in the great room/loft. The second guest room is wired for a fan but it was not installed in order to protect the children on the bunk bed.
Each ceiling fan has a wall switch to turn it on and off. There are remote controls to control the speed, direction, and light. The master bedroom remote is in the right walk in closet on a shelf on the right. The guest bedroom remote is in the closet. The loft remote is in the guest bathroom on a shelf. The great room control is in the drawer at the end of the island.
Mini split Heaters
The mini split heaters are capable of heating and cooling. The remote works on all wall units but must be pointed directly at the unit to be controlled. To turn on a unit, make sure the remote shows the off display. Point the remote away from all wall units or cover the end, then push the power button until the display shows off. Then point the remote to the wall unit you want to turn on and press the power unit. You can press the hotter and colder buttons to control the temperature.
To turn on a second unit, repeat the process but point directly at the second unit. One remote controls all units.
Do not use the setting for automatic conversion from heating to cooling depending on temperature. This will cause confusion with the outside heat pump when one wall unit senses a colder temperature and tries to heat while a second wall until will sense a hot condition and try to cool.
The lowest temperature that can be set is 59F. Set the units to heat to 59F. The units should start again with the last setting after a power failure. The toe kick heaters are used as backup in case the mini splits fail.
Plumbing
Manifold
There is a pipe manifold in the mechanical room. Every a single line runs to each individual fixture and each fixture can be turned off by rotating the valve a quarter turn.
Filters
There is a whole house filter in the mechanical room. Extra filters should be in a box, 3M AP 810 or equivalent. The wrench is hanging next to the filter sump.
There are two more filters for drinking water under the kitchen sink and these feed the drinking water fixture on the left side of the sink. (The filters have not been installed yet.)
Pressure Tanks
There are two pressure tanks under the left master bedroom closet floor. The access panel can be pulled up to see the ladder. There is a light under the left side as you descend the ladder. The pressure tanks and stainless steel pipes are on the right.
Water Heaters
There are two water heaters in the mechanical room. They are plumbed in series so you will not run out of hot water until both tanks are cold. CAUTION: do not turn on the water heaters unless they are both full of water. The heating element will burn up. Once water pressure is restored in the spring, turn on the hot water faucets until the water flows normally. Then the breakers for the water heaters, 5, 7, 9, and 11, can be turned on.
The water heaters can be drained to winterize the cabin. Run a garden hose from the bottom spigot on the tank to the outsize. Open the valve at the spigot by rotating the slotted screw a quarter turn, to align the slot with the hose. Return the slot to crosswise to the spigot to close it after draining is complete.
Frost Free Hydrant and Hose Bibs
There is one frost free hydrant in the back yard near the well. It supplies unfiltered water during the summer and is used to drain the well in the winter.
There are two frost free hose bibs, one at the front and one at the back of the cabin.
Septic Tank
Use garbage disposal sparingly.
Reduce water flow if possible.
Septic tank is under two green lids South of garage.
Effluent is collected in the first of two tanks burried in the ground behind the south side of the garage. Solids are allowed to collect in the bottom of the tank while liquids overflow into the second tank. Once sufficient liquid has collected in the second tank, a pump operates and pushes the liquid across the street and up to the drainfield in the upper middle of the upper lot.
Septic controls are mounted on south wall of garage. Power switch is on right and the pump control is box on left with red light. A red light flashing and buzzer making noise indicates the septic system is malfunctioning. The buzzer can be silenced by pressing the switch on side of box.
Do not put chemicals down any of the drains or toilets.
Crawl Space
There are eleven crawl space vents around the perimeter of the cabin. These are open during the summer and closed during the winter. There are foam plugs applied from the inside and plastic doors to close the outside. A vent on the front and one on the back were left open to vent moisture during the winter.
The floor of the crawl space is covered in plastic to minimize moisture coming from the ground. The crawl space is insulated to prevent the plumbing lines from freezing.