
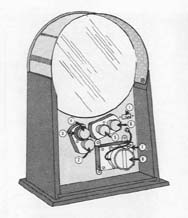
- 1. Jack For Electric Cord
- 2. Ivory Knob For Setting World Time Dial
- 3. Red Knob For Setting Moon Disc
- 4. Gray Knob For Setting Tide Disc
- 5. Blue Knob For Setting Star and Calendar Disc
- 6. Gold Knob For Setting Sun Disc
- 7. Brass Thumb Knob For Setting Standard Clock Dial
- 8. Heavy-duty Electric Clock Motor, 110-volt, 60-cycle AC.
COMPLETE DIRECTIONS FOLLOW
Place your clock upright on a sturdy table. Open protective cover on back of clock. Connect socket of cord to the two terminal projectors on the back plate of the clock and plug power cord into any conventional 110-volt, 60-cycle AC outlet.
Set your local time on lower left clock dial as you would an ordinary electric clock by rotating brass knob on the clock motor (7). You are now ready to set the individual discs comprising the large Space Dial.
One thing to remember is that in the gear train a small amount of backlash or play has been purposely provided. For proper setting eliminate this backlash by making the last motion a slight counter- clockwise rotation.
The Star and Calendar Disc (E) is set first. Before proceeding, however, look at the five separate discs shown in exploded view, and their relation to one another. Each disc has a letter for identification
purposes.
See the main Spilhaus Space Clock page for additional pictures and repair information