Pressure Bleeding the Brakes
The following was written by Tim Mullen for EliseTalk.com and copied here by permission. Pictures not credited are also by Tim.
Tim used the Eezi-Bleed pressure bleeding system. It is also possible to bleed the brakes with the help of an assistant. See my comments at the end of this page.
I jack my car up off the ground without using the ramps. See my oil change article for further information.
I also wrote an article about how to change your brake pads. I suggest changing the brake pads before bleeding the system. Changing the brake pads will force dirty fluid back into the reservoir and a subsequent bleeding will clear the whole system.
Please read Section JJ of the Lotus Service Notes for the Elise. This section covers the entire braking system. The brakes on a car are a critical safety mechanism on a car. A brake failure can cause an accident and may seriously harm the occupants. Please do not attempt brake repairs unless you are confident of your mechanical ability. These authors can accept no responsibility if you get it wrong.
Jacking the Car Off the Ground
I finally got around to uploading the photos from my brake bleeding session. I used my Eezi-Bleed as a pressure bleeder.
If at any time during this procedure, you spill any brake fluid, wash it off quickly and completely. Brake fluid will "eat" the paint.
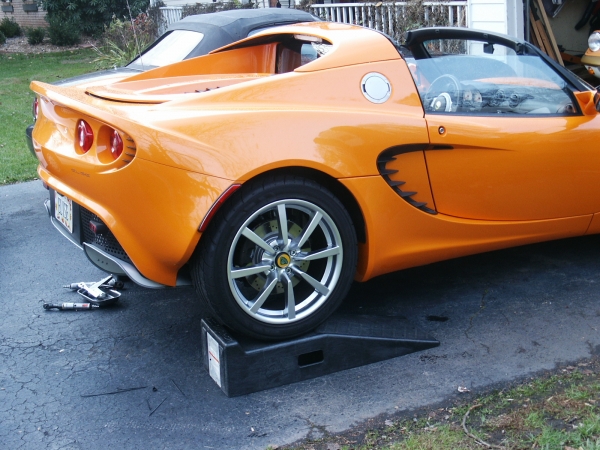
First thing I had to do was back the car up on my RhinoRamps. It lifts the car a bit in the rear so that I can slide under to remove the under-tray. There's not much clearance, but it's enough. If you used higher ramps, you may have more trouble getting the car up on the ramps. With the RhinoRamps, is very easy. With the car on my driveway, I placed the ramps up against the tires. The ramps will have enough clearance so that it clears the diffuser - higher ramps may not clear. Gently backup the ramps, and it will reach the spot where the car crests the ramp and gets to the flat top. The car may roll backward, but it will stop when it hits the blocks at the end of the ramps (unless you continue to give it gas and keep on backing up).
Next step is to remove the many bolts that hold the under-tray and lower the under-tray down to a hunk of cardboard. I then slid the under-tray out from under the car and put it aside.
Since the under-tray is off, the next step was to drive forward down off the RhinoRamps. At this point, the car needs to be jacked up. Place the jack under the "A" point on one side, and lift that side.
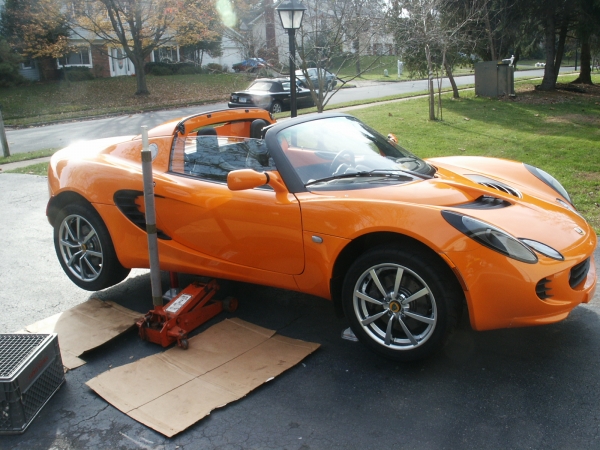
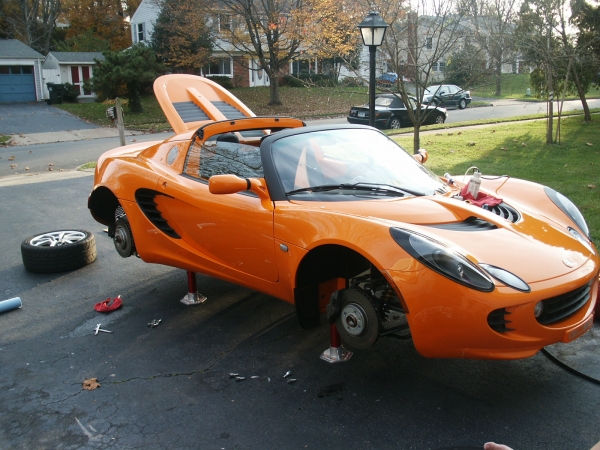
I then placed a jack stand under the "B" point in the front, and the "C" point in the rear. The jack stands were at their lowest settings. Time to switch to the other side. Lift the other side, again from the "A" point. Lift higher than the first side, and place the jack stands in the proper place, but raised up a few notches - you need to be able to get under the rear (under the engine area). Then, the jack is moved back to the original side, and lifted again until you can raised the jack stands to the same height.
Then, the impact wrench came out, and the lug nuts and wheels were removed all around. If you don't have air tools or an impact, loosen the lug nuts before you jack up the car.
Connecting the Pressure Bleeder
Now it's time to bleed things...
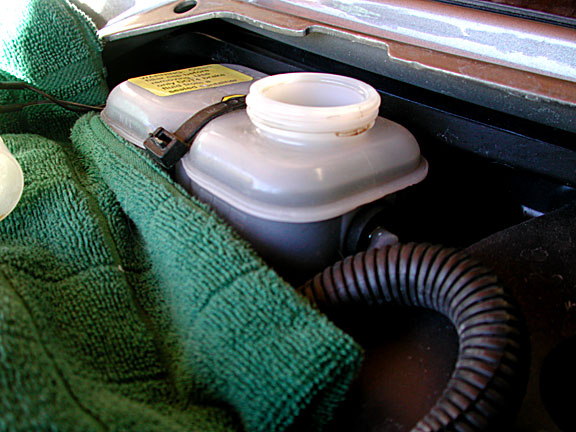
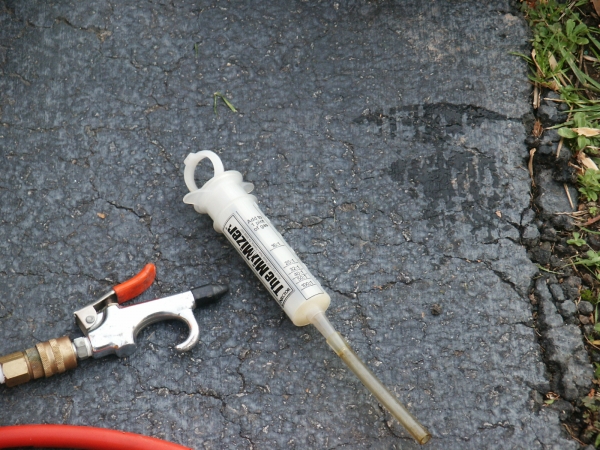
You need to suck out the old brake fluid out of the master cylinder reservoir. Many people use a "turkey baster" and they work fine. I use a "syringe" that I bought a few years ago - it's made to measure oil for pre-mixing 2 stroke oil, but I use it for my turkey baster. Remove as much old fluid as you can and put it in a container.
Now it's time to start putting new fluid into the reservoir. At no time during this process should you ever let the reservoir become empty. If you do, you will get air into the system, and with the ABS system, you will have a lot of trouble getting the air out of the brake system.
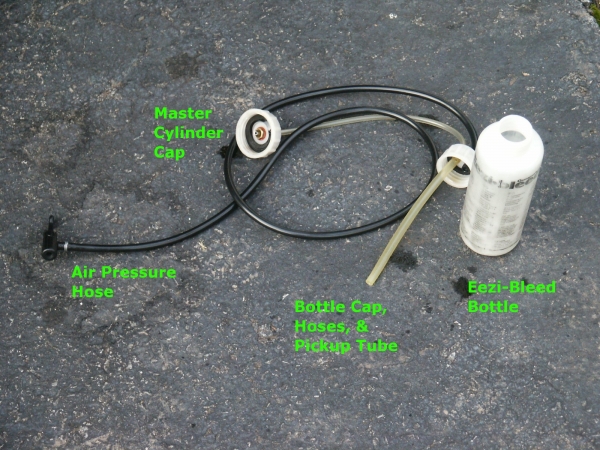
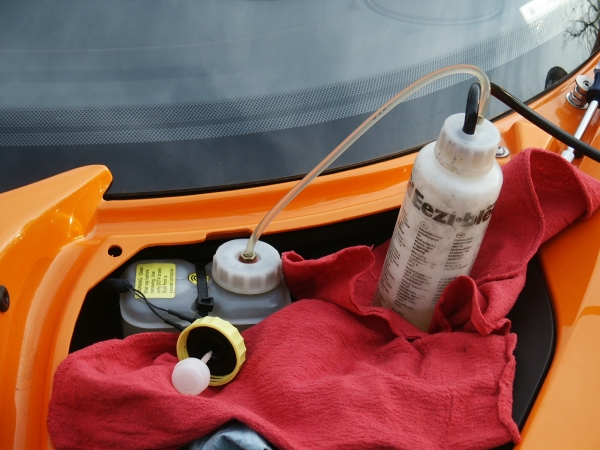
I used my Eezi-Bleeder to do the pressure bleeding on my brakes. Mine is years old, but it included the standard Girling master cylinder cap that perfectly fits the reservoir on the Elise. They Eezi-Bleed works by making an air tight connection to the reservoir with the cap. The cap has a hose that leads to the Eezi-Bleed bottle's cap. An extension of the hose reaches down to the bottom of the bottle to pick up the brake fluid. Another hose comes out of the bottle's cap, and leads to a tire valve fitting.
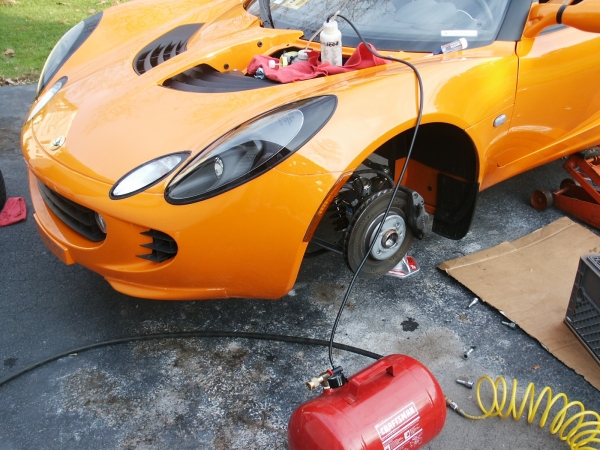
I have a "tool" that I made that has a tire valve fitting on one side, and an air hose coupler on the other. But this time, I used my portable air tank. The air tank is pressurized via a tire valve fitting - I added air until I had between 10-15 PSI on the pressure gauge. That's all the air pressure that you need to bleed the brakes.

With the Eezi-Bleed pressure hose connected to the tire valve on my air tank, I had a pressure bleeding system all connected up.
Pressurizing
First, thing you do, is pressurize the system with no brake fluid in the Eezi-Bleed bottle. This is to make sure that you don't have any leaks - the last thing you want is brake fluid spraying all over the place (brake fluid eats paint). Once that works (no leaks), you disconnect the pressure hose at the air tank. Then you add fluid to the Eezi-Bleed bottle, and re-pressurize the system - do not remove the cap from the reservoir, leave that alone, since you have a good air tight seal. For the rest of the process, you watch the fluid level in the bottle and repeat the steps to refill the bottle as necessary.
Bleeding the Clutch
I started with the clutch slave cylinder. Why the clutch, you ask? Because the clutch master cylinder shares the reservoir with the brake master cylinder. And the clutch system is probably what made the fluid so dark in color (clutch systems seem to do that for some reason). First you slide under the car (this is why we jacked it up so high) until you can access the slave cylinder. I believe that I used an 8 MM boxed end wrench on the bleed screw. Remove the rubber cap on the nipple, and then fit a hose to the nipple of the bleed screw. The other end is inserted into the old fluid container. Open the clutch slave cylinder's bleed screw and watch the fluid coming out of the hose (use a clear plastic hose, obviously). When you have clean fluid and no air bubbles coming out the hose, close up the bleed screw, remove the hose, and you are done with the clutch slave bleeding. Don't forget to replace the rubber cap on the nipple.
Check the fluid in the Eezi-Bleed bottle - don't let it get empty. I seem to remember that I had to re-fill the bottle during the clutch bleed - a lot of fluid is left in the reservoir (even after the turkey basting), so that gets flushed out along with the fluid in the clutch lines.
Bleeding the Brakes (rear)
Then the brake bleeding starts. Start with the rear brakes. You should start with the one farthest from the master cylinder, but the reality is that it doesn't matter. But start with the rear. Remove the rubber cap, install the hose, and open the bleeder ( 11 MM ). Open the bleeder and again watch the fluid until clean fluid and no air bubbles comes out. Tighten the bleeder, remove the hose, and replace the cap. Repeat for the other site.
One more thing I thought about... Brake fluid will leak out around the threads on the bleed nipples. You want to wash this off with something instead of letting it stay there or drip onto something later. I used a spray can of brake parts cleaner. After completing the bleeding at each nipple, I liberally sprayed the area around the bleeder nipple to dilute and wash away the brake fluid. I placed some shop rags below the area to catch the drips and wiped up what I could from the calipers.
Check the fluid level in the bottle often.
Bleeding the Brakes (front)
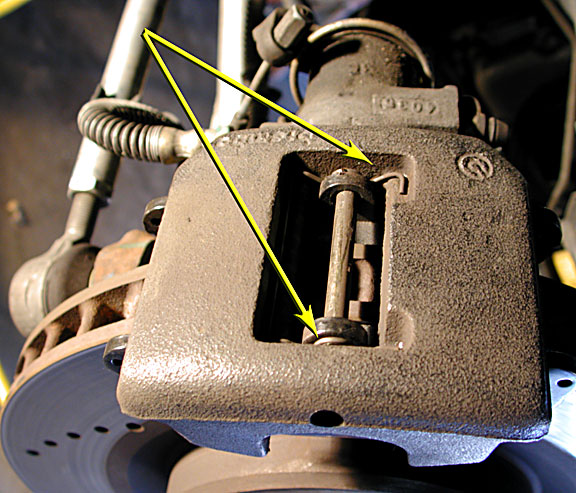
The it's time for the front. If you are just flushing the fluid, you can do the fronts just like the rear. If you are bleeding air out of the system, you need to unbolt the front caliper. Turn the caliper upside down, and bleed until you get no more air, and you get clean fluid. Then turn the caliper upright, and repeat. This is necessary because the fluid enters at the inside top of the caliper crosses over to the outside at the bottom and out the bleed nipple at the top. Air can be trapped, so that's why you need to flip it over.
If you are just flushing the old fluid from the brakes, you don't need to remove and flip over the calipers. Just bleeding it in place will flush the old fluid from the caliper and you will have clean new fluid in the brake calipers.
Repeat for the other side. Remember to check the bottle often.
Disconnecting the Pressure System
At this point, we are almost done. Disconnect the air pressure. Open the bottle and pour the clean fluid back into the original bottle or into the old fluid container. Put the bottle back together, and re-pressurize the system. Go to one of the brakes and bleed more fluid out. The reason is that the pressure bleeder will have filled the master cylinder reservoir to the top, and you want to get some of that out before you remove the cap. Bleed until the level is down to where it should be in the reservoir. Then remove the air pressure. Then carefully remove the cap - use plenty of shop rags to catch any fluid that may drip - remember brake fluid eats paint. If you spill any brake fluid, wash it off quickly and completely.
Put the regular reservoir cap back on, and replace the access panel.
Replace the Wheels and Lower the Car
Put the wheels on and install the lug bolts - snug them up until there is no slop. Jack up one side of the car (using the "A" point), and set the jack stands to their lowest setting and lower the car to the jack stands. Then go to the other side, lift it, remove the jack stands, and lower the car to the ground. Go back to the first side, lift the car, remove the jack stands, and lower the car.
Get out your torque wrench and tighten the lugs to 77.5 ft-lbs all the way around.
Place the RhinoRamps, backup on them and install the under-tray.
Drive off the RhinoRamps (make sure you go forward), and you are done. Unless you need to flush the ABS system too. If that is the case, take the car for a drive, get it up to around 60 MPH, and slam on the brakes hard enough to activate the ABS. Repeat several times. Then redo the entire bleeding process.
Notes by Tim
You can probably get away with bleeding the brakes by reaching through the spokes of the front wheels (I didn't try this - so do so at your own risk). The back may have to be on the RhinoRamps to access the rear brake bleeders, but you might be able to reach around and get to them.
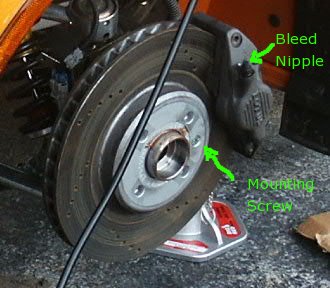
While I had the car in the air, I did a couple of extra things. I removed the Allen head screw that holds the brake rotors on (in position). I added a dab of anti-seize and re-installed the screws. That way they should come off in the future without problems.
I also removed the rear wheel well liner and popped out the air filter. Mine wasn't bad, and I didn't have a spare one, so I put it back in. One thing I did note that I had not seen mentioned here on the forum - the screws that hold the wheel well liner in place are Pozi Head screws. My regular Phillips wasn't making a good fit, and I noticed the extra "tick" marks on the screw head. If you don't have Pozi screw drivers or bits, get some. There are lots of Pozi screws on the car, and Phillips head drivers just don't work right.
It was pointed out to me that I should mention one extra tip. After you suck as much of the old fluid from the reservoir as you can, top it off with new fluid before you connect the Eezi-Bleed cap. That way, less of the fluid will be used up in the bottle during the first pass. I used pretty much a whole bottle of brake fluid doing this flush. I let a lot of fluid flow from the clutch to flush out as much of the old fluid that I couldn't suck out of the master cylinder reservoir. I also ran more fluid out the front brakes than probably absolutely necessary just to ensure that no (or at least less) old fluid was trapped in the inside half of the front calipers. It could probably have been done with less fluid, but...
Notes by Me
It is also possible to bleed the clutch and brakes without a pressure system like Eezi-Bleed. With the help of an assistant, they can pressurize the system for you as you go to each bleed nipple.
- place the clear tube over the bleed nipple and the other end into a container that contains some old brake fluid. The free end must be kept submerged so no air can enter the system.
- open the nipple so fluid can be expelled.
- have the assistant pump the brake pedal until no further bubbles are seen and clean fluid flows into the container.
- while the assistant is pushing the pedal down, close the nipple. This last stroke helps prevent any air from entering the system at the nipple.
I have employed this method with the assistance of both my wife and my daughter. It helps bond the assistant with those things Lotus and also educates them about how a car works. I look forward to doing the same with my boys.
I replaced my brake fluid with Motul RBF 600. It took two 500ml (1 pint) containers but I was not trying to conserve fluid. Once a container has been opened, it will not have a long shelf life as it will absorb moisture and not be effective.
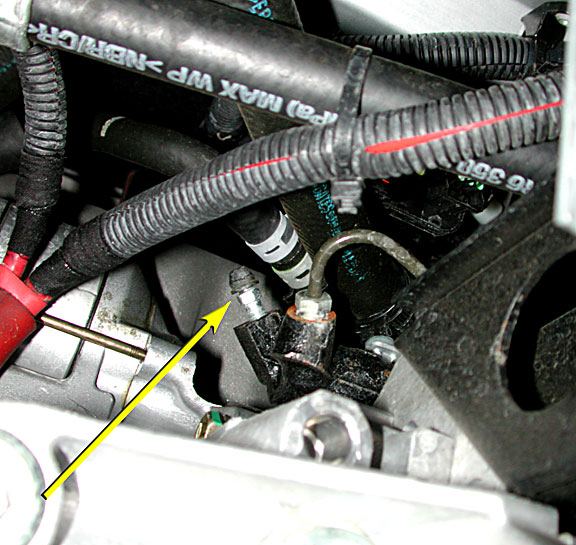
This picture shows the location of the clutch bleed nipple, up near the oil filter.
The rear brake bleed nipple is in the upper right hand corner, near the "C" stamped in the casting.
It has been said that if air does get in the front calipers, changing the brake lines for example, they can be bled by removing the caliper and placing the cross over tube up. Bleeding will force bubbles to the top, and then the caliper can be rotated again to its normal position and the bleeding continued to remove those same bubbles from the caliper.
Lotus Bleeding Instructions
If the brake fluid is to be renewed , or an hydraulic component replaced, the system should be bled of air using the following procedure:
- Using conventional manual techniques, or low air pressure applied to the reservoir, bleed the system from each calliper bleed nipple in turn until no air bubbles can be seen.
- Connect the Lotus Scan tool and select ABS and follow the brake bleeding instructions. Whilst this automatic process is taking place (with all 4 calliper nipples open) gently cycle the brake pedal up and down whilst keeping the reservoir topped up, to move any air bubbles displaced from the ABS unit down the hydraulic lines. Finish by closing each nipple with the pedal down.
- Repeat step (1) to purge each calliper feed line in turn.