
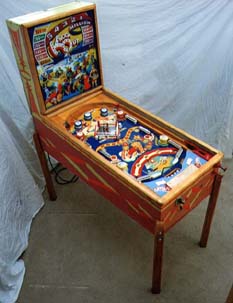
Knock Out (Gottlieb 1950)
written and published in pinGame journal, November 2000
Research and Philosophy:
Every once in a while, I come across a game that is a pure joy to restore. The reasons are many, but in this case it was because the game was in such great condition. Sometimes this is a result of a game not seeing much use. This was not the case here as there are 73, 464 plays on the counter! This game was a joy because it soon became obvious the original operator kept the game in exceptional working condition for its entire working life. There is lots of evidence, described later in this article.
People who work on watches and clocks often sign their initials and the date inside the case, after completing extensive work. You can see the history of the piece by the signatures and dates. This game had the letters "RCA" on the backside of the ball tray. If you are out there and you operated this Knockout, I would love to meet you. I want to spend hours with you, learning all your skills. I just hope my restoration will meet with your approval.
There are many ways to "restore" a game. The game can be repaired, with minimum effort spent on shining the cosmetics or preparing for long term use. Or the game can be fully restored, with every mechanism cleaned and rebuilt, with the cosmetics renewed, and all components checked to make sure they are correct for this particular game.
The decision on which philosophy to use depends on the value and condition of the game, why and for whom it is being restored, and how much time and energy you have. In this case the game is collectable, being from a more desirable era. It was also in exceptional original condition. I am considering retirement and have a fair amount of time. Best, owner trusts me and was willing to let me do an exceptional job.
So I decided to do a "museum quality restoration". The game will be fully restored. All mechanical assemblies are removed, cleaned and reassembled, according to the way it was originally built. Corrosion and rot is removed or sealed. All broken pieces are repaired or fabricated as original. Any major cosmetic damage is repaired, but every attempt is made to retain original cosmetics, preserving the patina and appearance of being used. The game is 50 years old and should look like it did when on location. Most important of all, the game is meant to be played. Every effort will be made to make it play like it did when it left the factory in 1950.
I research every game before starting the restoration. This includes getting a schematic if available, looking for the game in my library, and searching the insides for other clues. I also look in the United States Patent Library for possible patents, using the company name and the designers. The really old patents often contain schematics, rules and goals, mechanical drawings, history, and game objectives. These can be very helpful in restoring the game to original specifications.
The Internet is also a great research tool. The news group, rec.games.pinball, is inhabited by many helpful people. Often you can find someone with the same game and you can compare notes. There are also pinball related web sites. Dave Byers maintains the Pinball Pasture, in Sweden of all places, and this site contains pictures, serial numbers and links to other helpful sites.
General disassembly and cleaning:
In general, I use many boxes to keep parts, nuts, and bolts together. I like the shallow boxes that separate soda cans. Each assembly is removed, disassembled, cleaned and reassembled. Since all the parts are together for a score unit, pop bumper or what ever, it is easy to tell where extra parts belong. Finished assemblies can be left in the box until they are ready to be reinstalled.
I use many cleaning methods, depending on the dirt and object to be cleaned. Unless otherwise described, my most common methods are as follows.
On larger assemblies I used bathroom cleanser. It quickly takes off the dirt and grease and leaves the parts with a soft shine. It is extremely important to rinse and dry the metal completely, leaving no grit, old dirt, or chemicals to prevent parts from moving smoothly and easily.
I like to use an ultrasonic cleaner and watch cleaning solution on complex assemblies with hard to reach nooks and crannies.
I do not know why but the mechanical assemblies in this game cleaned up especially well. Old springs usually have some corrosion but there was none in this game and the springs shine. There was little corrosion or staining on most metal plates. There was some flux left over from soldering. Over time, the chemical reaction continues, causing rust and corrosion. This is difficult to clean, but alcohol, applied with a tooth brush, does help remove it and prevent continued deterioration.
I used polyurethane rather than shellac, lacquer, or other finishes, to protect high wear areas. The new water based polyurethane, like Diamond Finish from Flecto, goes on easy, is easy to clean, and is very hard. Most importantly, it can go on as a thin coat, and dries very thin, thus preserving the character and shape of the wood. I never use gloss and prefer to use the dull finishes as yet another way of preserving the aged look.
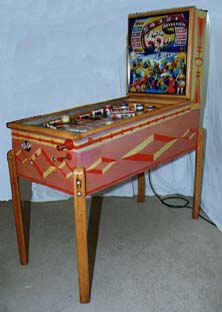
Cabinet:
I like to remove everything from the cabinet. This facilitates the cleaning and repair of the cabinet as well as all the removed components. I cleaned inside of the cabinet, first with alcohol and then with cleanser. The alcohol actually removes some of the grease stain from the exposed grain in the wood. The outside got the same treatment. I was confronted with my first difficult restoration decision. One side of the cabinet must have faced a window and the sun caused the side to fade slightly. I decided it was not bad enough to require repainting the cabinet.
There was extensive wear around the flipper buttons. The paint was not only gone but the wood was severely worn and stained with sweat and gouged by rings. I think human oils and sweat are some of the most corrosive chemicals in the world! Just look at old coin mechanisms. I used alcohol to clean as much of the stain as possible and then used an airbrush to replace much of the color. I needed to match colors on each side, because of the faded colors on one side and the original colors on the other. I also used a couple of techniques to age the restored paint in order to improve the match, like gently adding some pencil marks and scratches. I added a coat of polyurethane to keep the same wear from happening again. The protected area blends in with the rest of the game when the wax is applied.
I actually had to do the paint matching and air brush twice! The first time I matched the paint on a dirty cabinet. Cleaning the cabinet brought out the color and my matched area was dull in comparison. I should have known better.
The cabinet showed the normal grunge and dirt. The triangular wood blocks holding the side to the bottom were split away from the side. The wood was clamped and glued. Cracks were not repainted, but left to show age. The wood rails were badly marked and were missing some finish in places. I sanded them and gave them a coat of polyurethane.
The wood legs arrived with brown packing tape holding them together. Since any original finish is marginal at best, the oil and adhesive in the tape was absorbed into the wood. As mentioned before, I like to keep the patina of the old parts but this was not possible, as the tape marks were obvious. I sanded off the marks and what finish was left and added a coat polyurethane finish. I did not refinish the legs completely, choosing to leave the marks, gouges, stains from mopping the floor, and rough original wood surface as appeared in the original. These effects allowed the game to retain some of the character resulting from many years on location. New anti-split posts and screws were installed to prevent future splitting.
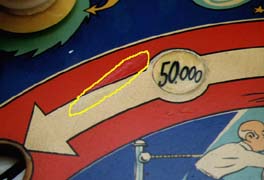
The touch up area is encircled with yellow. The white paint was yellowed and marked with a nickle and with pencil lead in order to make it look aged and played.
The patched area was also covered with polyurethane to prevent wear in the future.
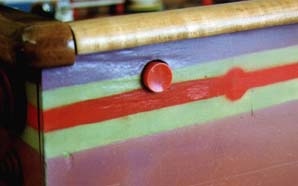
A large area around the flipper buttons was worn down to the wood, and the wood was gouged from extensive play.
The area was air brushed to match the orginal art work and then covered with polyurethane to prevent wear. The angle of the photograph and lighting were carefully planned to enhance the fix, showing the patched area. In reality, the gouge is not noticable.
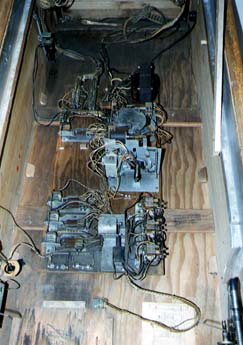
Bottom board:
The relay board in the bottom of the cabinet was the dirtiest, darkest mess I have ever seen, especially compared to the rest of the game. I used carburetor cleaner and a tooth brush to clean the wiring. The highly volatile solvents in the cleaner float the dirt and grease away. You can see the original color coding on the cotton covered wiring using this method, but you need to let the wiring dry completely. The cleaner leaves little residue but the relay contacts will need to be cleaned in any case.
I rebuilt the score unit and the reset unit with motor. The gears are cleaned with the ultrasonic cleaner and the felt replaced and oiled. On the older motors, the felt that feeds the faster turning gears has often dried out. They need to be soaked in oil and reinstalled. I straightened all switch blades, tightened the switch stacks, and passed a rough business card between the contacts. I needed to readjust the switch distances as tightening the stacks often reduces the distances, due to shrinkage of the insulation. On the high current contacts, I used a brass wire wheel to polish the contacts and used contact file if the surfaces were badly pitted.
I retained the relay labels and replace a couple that were torn.
I checked the transformer to make sure it was not on the high tap and replace a couple of the coils because the sleeves were frozen in the coil.
Evidence of great maintenance was everywhere. All screws were correct and all had the original lock washers. All the blade switches were straight or only had slight adjustment
bends. None were bent at the block or tweaked and all were the correct length. Solder joints were done correctly rather than just touching the wire to the post and letting the solder cool. Lubrication was not visible and only found in rare cases where needed.
Head and score board:
The head unit was in pieces when I got the game. I glued and nailed the backglass frame back together. I refinished the frame for the backglass as I wanted it to match the finish on the woodrails. I carefully sanded the edges and was able to retain the original black paint around the inside of the frame.
I again used carburetor cleaner to flush some of the dirt off the wiring.
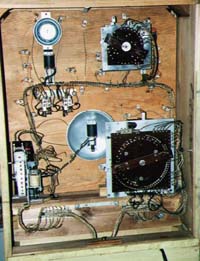
The mechanisms in the backbox presented another challenge. The credit wheel and 100,000 score unit were complete but the 10,000 unit and two bells were not. I took detailed pictures of board and the 48incomplete units and placed them on my web site. I then called Steve Young at Pinball Resource and ordered the missing pieces. Soon the lever arms, bell brackets and solenoids arrived.
I cleaned up the bells and they sounded much better of course. I also cleaned up the wiring and replaced all the lamps with #47 bulbs. These run cooler, with little loss in light, compared to the original #44.
The contacts on the Bakelite boards can be cleaned with a wire brush on a small rotary tool, like a Dremel Moto-Tool. Care must be taken with the springs on the contact plate, to make sure the moveable wiper arm moves freely. Careful cleaning with a tooth brush will help. The return springs on the score wheels need to be readjusted. Often the operators just increase the tension rather than carefully cleaning the surfaces. Once cleaned, they may snap back too quickly, causing undue shock. My springs were not tight and needed only a slight pressure to adjust.
I added felt patches to the backglass side of the light board. These protect the old glasses and prevent wood from directly contacting the painted side of the glass, thus preventing further loss of paint.
Most of the inserts have been removed. The plastic shrunk and they were no longer stable.
First they were glued and then epoxied back into their holes. Then the paint was touched up and a coat ofpolyurethane put around the edges.
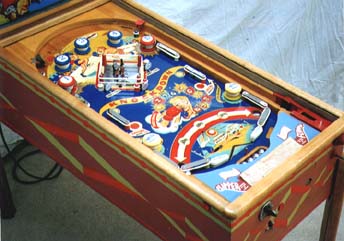
Playfield (underneath):
All pop bumpers, sling shots, flippers, and score reels were removed and cleaned. The lights in the pop bumpers were unsoldered so the top components could be removed when it came time to clean the top components from the playfield.
There were lots of weak solder joints, made so partly because the flux for the solder was never completely burned off or removed. Many contacts needed to be reflowed with solder.
The game apparently suffered from heat stroke! The rubber rebound grommet on the knocker was melted and flowed into the bottom of the cabinet. All but two coil sleeves were stuck in the coils because of heat or age. There are two philosophies here. First all coils should be retained as original and the internal brass sleeves just cleaned. Many of the really old coils are difficult to get and reproductions do not look the same. Old coil wrappers were black, with no label. New wrappers are color coded, bright and have the coil number printed. Or you can replace all coils, to take advantage of the new nylon sleeves. I chose to do the latter, wanting to make sure the game plays as well as possible.
Steve Young cautioned me about replacing difficult to source coils. We need to conserve the unusual ones, ones that have not been reproduced, so that non-operational games can be made to work again. In my case, all coils were operational and I did not replace the unusual ones.
I retightened all the switch stacks and bent the leaf switches back to straight. I did it carefully to make sure all makes were in the right order. Invariably some problems in the game result from doing this, but once solved, the game become very reliable again.
The set screws on the knock down score unit were not positioned correctly and would move every time I retightened them. I carefully filed down the set screw marks in the shaft and swapped the set screws to encourage them to forget where they were the last time and assume their new positions.
One of the flippers was corroded solid in the flipper bushing. Liberal application of penetrating oil and a long bath in the ultrasonic cleaner freed it up. The holes in the flipper links were elongated, both at the plunger and the lever arm ends. These are not available as reproductions and needed to be reconditioned. I carefully drilled the holes larger and screwed in a portion of a hardened bolt. The ends of the bolt were ground down flush with the plate, and the plug braised to the link. Then I drilled a new hole of correct size in the bolt insert, providing a harder surface than the plate and thus preventing future wear.
I cleaned and lubricated all the components as recommended by the Game Lubrication chart in the parts catalog. Lubrication is taboo in modern games, due to the lubricant attracting all the dust and dirt flying around inside a game and then causing excessive wear. I believe there is less stuff to attract in older games like this and the weaker coils need all the help they can get. Most of the lubrication is hidden inside assemblies.
I found the return springs on the score units, flippers, and out hole were set correctly after cleaning the component. This is unusual as most operators just tighten them rather than cleaning, to make it operate correctly. The operator in this case kept the game clean and working easily.
The slam tilt was set correctly and was not bent apart as is often done.
Playfield (on top):
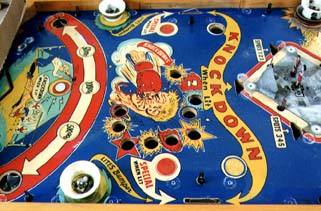
Now for something entirely different! Instead of mechanical work, now I was confronted with cosmetics. All the plastic inserts, counting the number of knockdowns, had shrunk with heat and age, and were separating from the wood of the playfield. I first consulted the Internet, rec.games.pinball, about recommendations for how to restore these. I wanted to preserve the graphics and was worried the inserts might be warped. Warped inserts do strange things to ball movement and play. The best suggestion was to place the insert so the tallest portion was level with the rest of the playfield. Then the low areas can be filled with clear paint or polyurethane. This preserves the original graphics and lets the ball roll smoothly. The inserts on this game were flat on top but did not fill their holes. I used epoxy to glue them in and then proceeded to touch up the gaps with paint.
There were two long wear spots in front of the kickout holes. I matched the paint as well as possible and touched up this area. I did not opt to fill the level of the playfield because this usually destroys some of the original paint around the wear area, as the fill is sanded level. It was a challenge matching the white paint as it yellows over the years. Also there is a texture of ball marks and cracks in light paint. Touch up of larger areas looks overly clean and unmarked. So I used careful pencil and scratch marks to simulate wear and then covered the patches with semi-gloss polyurethane to protect my pencil graffiti.
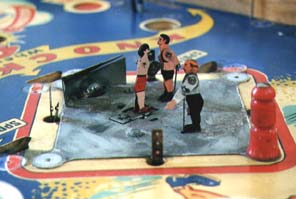
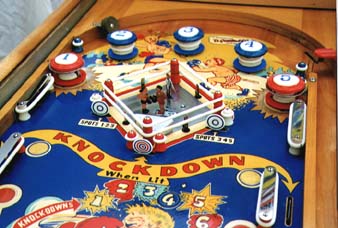
One boxer was missing his arms so I reproduced these out of brass plate, using the other boxer’s arms as patterns. The actuating rod in the referee’s arm had elongated its hole through years of use and so I swapped the arms. I thought drilling an extra hole in the other arm was better than having to fabricate a reproduction arm. The boxers are mounted on metal plates.
The boxer that gets knocked down is on a movable plate. Since the boxers are like tin plate men, they are mounted by slipping their feet through slots and twisting the metal. The poor boxer who gets knocked down has suffered the abuse of getting knocked around for fifty years and his legs were very weak. I cut additional brass feet for him and soldered them to his original feet. The heat burnt off his clothes and so he needed new trunk and leg paint.
The boxing ring was corroded and the metal stained. I carefully sanded it with 600 grit sandpaper and then cleaned it with cleanser to reduce the sand marks and pattern.
Research on the Internet, in the Pinball Pasture, found a picture of Knockout, taken by Russ Jensen. It showed two blue bullseyes on the sides and one red, white, and blue bullseye in the center. My targets were hand painted, all red, white and blue, and needed to be replaced.
I spent hours waxing the game. First I used alcohol and naptha to remove the old wax. By carefully polishing the game, old oxidation was removed and the original colors were allowed to shine through. It was amazing how well maintained this game was! I only needed to retouch the paint around the inserts and the wear marks in front of the kickouts. The rest of the paint was in exceptional condition and just needed some good paste wax to bring out the colors.
New rings and lamps were installed. Again, I use #47 lamps because of their reduced heat.
I did need to replace one bumper skirt as it was the wrong color. All other components, including posts, bumper caps, guides, and flippers, were correct. This is an amazing accomplishment for a game this old and due to the great operator!
Tuning and punch list:
I reassembled the game and turned it on. As games I restore are want to do, it refused to start up. A schematic is often little help, with out extensive study, in understanding the sequence needed to start a game. There are the normal problems with score reel games needed to be at zero, but this has bulb scoring! There are the normal problems with checking for tilt, the score motor perpetually turning, or dirty contacts. None of these applied to this game! I had forgotten to solder the wires on the bank reset solenoid. However, once solved, the game played well and only required minor additional diagnosing.
Well, maybe not so minor. For example, this game proved to be difficult. At various times during play, it would turn off. In the middle of a game, especially when working on a new high score, the game would go dark. This was a difficult gremlin, as there was no particular switch or action that would cause the problem. After many hours of play and diagnosis, I noticed all the features being triggered just prior to the problem, were on the bottom board.
Found! The off switch is a rod that rests on the bottom of the cabinet. The location owner can thump the bottom of the cabinet, imparting momentum to the rod, which hits a leaf switch and removes power to the power relay.
In my zeal to adjust all switches, polish the rod so it would slide easily, and to make the game function easily, I had removed too much tension on the power switch. It was bouncing when relays clicked on the bottom board, causing the game to power downThe normal other relay and score unit adjustments were needed.
I purchased a reproduction tray liner and reproduced the instruction card myself. The old card was scanned into Adobe Photoshop. All graphics and lettering were touched up and turned into fresh color. The new card was printed on high quality paper and installed. The same can be done with the tray liner but was not necessary in this instance. The same process can be used to reproduce backglasses. It was not necessary this time as I was able to install a reproduction glass.
I did not reproduce the labels indicating the relay names in the relay bank or the high scores settings on the score units, preferring to make use of the dirty and faded originals. I think most technicians are more interested in setting up the game and are not frustrated by a little dirt.
The game was tested and exercised, in order to remove infant mortality problems and validate play, by my qualified quality assurance team. Ryan (6), Dustin (8) and Lynne (wife) helped immensely in this task, and never complained once.
I spent 52 hours and $280 in parts and material to restore this game. Efforts like this need to be a labor of love as they are too expensive to be commercially viable.
Credits:
I got a lot of help restoring this game. Steve Young at Pinball Resource, Jim and Judy Tolbert at For Amusement Only, Steve Engle at Mayfair all provided parts or information. Several members found on the Internet, particularly in the rec.games.pinball news group, helped with restoration ideas and information. These included historian Russ Jensen, David Byers, maintainer of the Pinball Pasture, and pinball technicians and restoration artisians, Jonathan Deitch, Clay (cfh), John Robertson, Ray Johnson, and Cliffy.
This article can be found on the web at the Sands Mechanical Museum