
Sportsman 1936 (Jennings)
The article as submitted to GameRoom Magazine contains a less technical description of the game.
The payout mechanism and coin rejector mechanisms are explained and animated in a different part of the museum.
Introduction
Jennings made the Sportsman in 1935 and 1936. Sportsman is a payout pinball. The player approaches the game and puts a nickel in the coin slide. The slide is depressed and the player starts shooting the balls, playing it like most normal pinball machines. Upon placing balls in the correct pockets, the player can pull a lever on the side of the machine, which causes nickels to be paid out in a trough at the bottom of the machine.
A skillful player may be able to walk away with more coins than he started.
Jennings was a successful slot machine manufacturer and started making payout pinball machines to give the appearance of skill required to obtain money.
Two Sportsmans were restored at The Sands Mechanical Museum. This article documents those restorations.
History
Jennings
Jennings started producing slot machines in 1920 and was the second largest producer of slots after Mills. They continued to innovate and are known for adding a mint vendor to the slot machine. This was designed to reduce the appearance of a gambling machine by providing a mint for the money gambled. The reels were decorated with symbols that implied flavors of mints, such as cherries, lemons, and other fruits.
In 1929, they also developed a method of separating checks or tokens from real money. Tokens also gave the appearance that the machine was not used for gambling, but was for entertainment. Slot machines were starting to take money away from pinball machines. Customers preferred to play a game where winning money was possible.
Watling produced a payout pinball in 1932 called Blue Seal and Gottlieb produced Cloverleaf the same year. Bally produced Rocket at the end of 1934, but it was ten balls for a nickel. The goal was to increase profits. Three ways to do that with a game are to attract more play, get more plays in a shorter amount of time, or increase the cost per game. Bally did all three with Red Arrow, which cost five cents for one ball, and quickly became the industry leader.
In San Francisco (1933) and in New York (1934), the mayors started to wage war against all gambling equipment. It was clear to the slot machine manufacturers like Mills, Fey, and Jennings that the appearance of gambling needed to be avoided. Adding skill to a game became important.
Jennings was also watching its competitor, Bally, and also wanted to develop pinball machines. Pinball machines hide the fact that they were gambling machines. Including a skill shot implied the game could be beaten and the player was therefore not gambling. The Sportsman included a skill shot; however the winning of a payout was still mostly a matter of luck.
Most of the pinball machines made in the early 1930s did not use electricity. Some of the games contained mechanical assemblies to move or divert the ball. Contact Jr., designed by Harry Williams, was produced in 1934 and was the first game to actually move a ball by electricity.
The electronics, especially the logic and relays, in The Sportsman were very sophisticated for the time. While the electronics did not move the ball, they did determine if there were any winnings, the amount of the winnings, and logic to prevent paying out more than what was won. The electronic logic included in the game was unusual and was developed over several years.
Cliff Dumble designed the game in the summer of 1933. It required another year of development to perfect the payout mechanism. Handling money requires the machine to be reliable and to payout all winners and many companies that manufactured payout pinball machines did not last because of problems handing the money.
According to Richard Bueschel in Pinball 1, "The original model was a fairly standard 18" x 38" playfield game with a deep boxy square-legged cabinet to hold its combination mechanical and electronic payout system. The most colorful feature is the playfield, a full field beautiful painting of a hunting scene."
He later describes the Improved Sportsman, "The IMPROVED SPORTSMAN of January 1935 cleaned up the game a great deal, with a completely new cabinet of "Deluxe Size 18-1/2" x 42" and lots of cast aluminum housings. The greatest physical improvement is a positive action payout lever at the side, eliminating missed payouts…"
Jennings also made a slot machine that vends golf balls, also called a Sportsman, and was popular until new laws made them illegal in 1951.
Patents
The patent search is incomplete because the patent library is moving. However I have 2,003,349, issued to C.R. Dumble in November 23, 1933. It covers the layout of the game, the logic relays under the playfield, and the payout mechanism. He used mercury switches at each hole location. He also used a push rod to power the payout mechanism directly, rather than the current system of levers and springs. It shows his intentions for a gambling machine, but also suggests merchandising vending could be added, again trying to avoid the appearance of a gambling device.
Play
Appearance
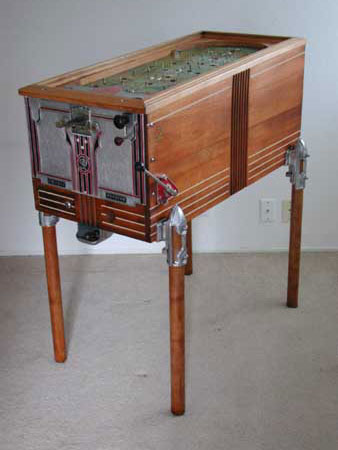
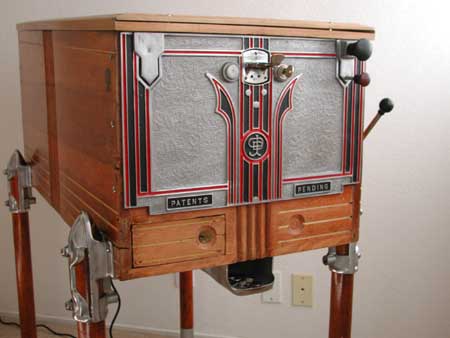
The game is slightly smaller than a standard sized pinball. It is 38 inches long and 17 3/4 inches wide. At the back, it is 42 inches tall. The two most striking features are the leg castings and the casting that covers almost the entire front.
The cabinet appears tall and narrow compared to modern pinballs. There is no backglass or score box.
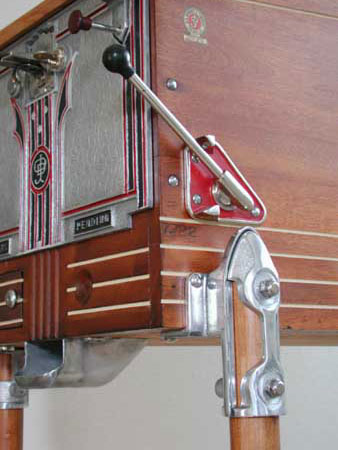
Along with the expected ball left and shooter, there are two additional features on at the front of the cabinet. The payout lever pivots from the right side of the cabinet. There is a payout drawer with key slot under the front edge of the front casting.
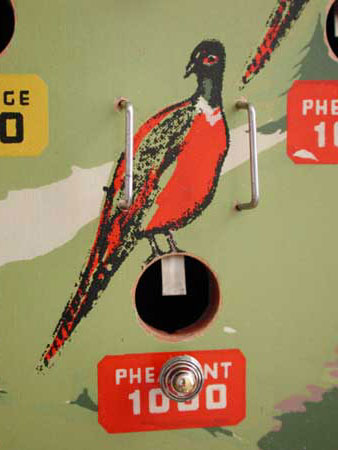
The theme of the game is hunting. At the top is a hunter with a gun. Each of the important holes has an animal above it, indicating the relative value. There is also a point value associated with each hole. There are squirrels, rabbits, pheasants, and partridges. The animals that payout more coins and are worth higher point values appear in more places and further down the playfield. There are trees and other plants that decorate the playfield.
The two restored games differed in color and detail of the artwork. On 7722, the blues were more saturated, while the 5620 was almost off-white. These colors were not faded and the color was just as intense in hidden areas of the painting. The detail of the black outlines and the care taken in the paint process was much more evident in the earlier game, 5620.
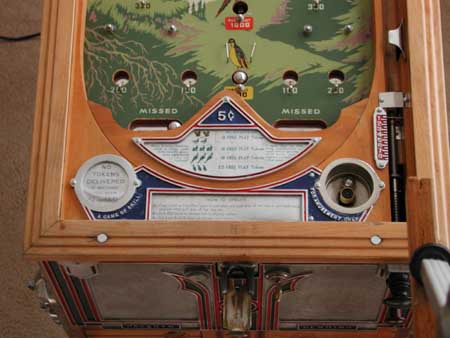
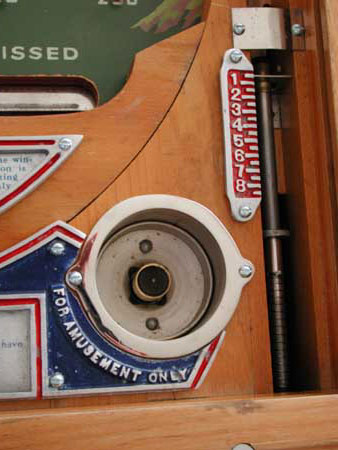
Game 5620 has a casting holding the instruction card and payout amounts. There is also a cast shooter gauge next to the end of the shooter. Game 7722 has an embossed instruction card that is nailed to the playfield and appears to be ink painted on silver paper. The shooter gauge is embossed foil. The instructions for both games are the same.
To gain access to the game, the whole playfield and glass are hinged at the back of the cabinet and locked at the front casting. The playfield glass is held in the wood frame and can be removed by unscrewing two blind fasteners holding on the front trim piece. Once the playfield is raised, there is easy access to the coin slide, payout mechanism, and relays under the playfield.
The coin box can be removed by unlocking a small door to the left under the casting.
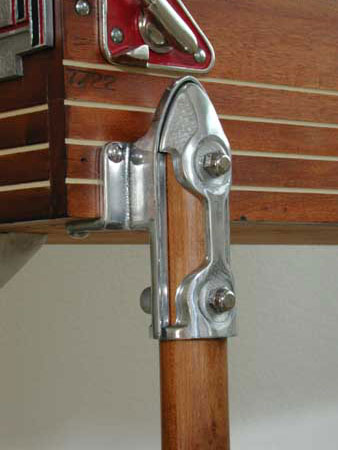
The woodwork is in art Deco style, with grooves along the length and rounded vertical scallops in the middle. The leg castings are prominent features, with intricate cut out work, texturing, and polished aluminum. The legs themselves are simple round sticks and are captured by the leg castings. The castings allow the game to wobble, as the wood is not held tightly.
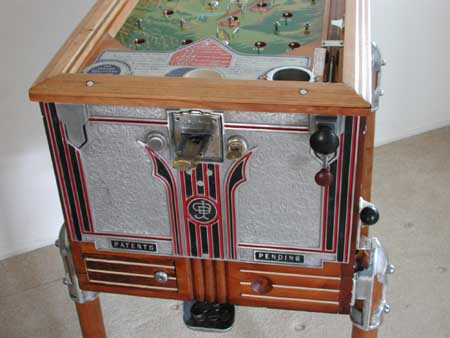
The front of the cabinet is a casting and is decorated with black and red paint, and the Jennings logo is featured in the middle. The casting provides mounting for the coin slide, ball lift and shooter, the playfield lock down. It is also textured and has the words "Patent" and "Pending".
Object of game
The object of the game is to play one coin and win as many coins back as possible. To do this, various payout combinations need to be completed and the payout lever pulled. For each winning combination, the pull of the lever rewards the player with a specific number of coins. The more difficult the combination, the more coins are rewarded.
However, before any payouts can happen, the skill hole needs to be made. This skill shot turns the Sportsman into a skill game and removes it from the classification of a gambling game. The skill hole is at the top of the game, has some bumpers that help lead the ball into the skill hole, and can be easily made!
The player will try and get a ball in each hole of a particular animal. For example, there are three rabbits, so the player will try and get a ball in each rabbit hole and one in the skill hole. A pull of the payout handle will reward the player with six coins!
Interestingly, there can be multiple payouts during each game! This is where real excitement happens. A perfect game goes like this: the skill hole is filled and the three partridges are filled. The player pulls the lever and is rewarded with 12 coins. Since only four balls have been used so far, the player shoots three balls into the pheasant holes. He pulls the lever again and is rewarded with nine more coins. There are still three balls left. These can be placed in the three rabbit holes, resulting in six more coins. The result is a total of 25 coins!
Unfortunately, it is possible to miss being paid for all combinations. For example, if you get both the partridge and the pheasant before getting the skill hole, the lever will only payout the lesser combination, and the partridge reward of 12 will not happen.
Layout and odds
The holes are laid out as you might expect, with the higher paying combinations placed in more difficult to reach areas of the playfield. Also more animals are required to make the more difficult combinations.
The skill hole is relatively easy to make and while giving the appearance that the game is legitimate, the astute player will notice how difficult the other hole combinations are to make. The designers of the game also placed additional holes, not associated with any animals and so non-paying, around the top of the playfield. These extra holes serve to capture some of the balls, reducing further the possibility of getting a winning combination. Jennings also supplied the operator with "percentaging caps" to help tailor the game payout possibilities. Four hole covers were supplied with the game and the operator could cover the top holes, making it easier for the player to get balls into the animal holes.
Restoration
Objectives
I try to do a number of things when restoring a game. I think about what I want to accomplish and what the objectives are before I start. Later, when encountering problems and thinking about the alternative solutions, the decisions can be guided by the original objectives.
This helps me avoid the common problem of an uneven restoration. It shows up with one part all shiny and new but sitting next to another part that is dull. A nice set of shiny refinished legs does not look good on a old, dull and worn cabinet, even if the cabinet has a wonderful old patina.
Some of my thoughts when considering a restoration are:
I try to restore games as a museum would. A museum will do a number of things when restoring an object. First they will research it so they understand how it works and what the artist or builder originally wanted when they built it. Then they will research the tools and manufacturing methods used to make it. The same tools can be used in the restoration process. Finally, they will preserve the object, making sure that no further deterioration or wear takes place.
I want to make the game look as it was played for a week or a month and then taken off location. The game will be played, all the problems worked out, and the players will have enjoyed it for some time. Most of the cosmetics will be intact but there will be some evidence of wear. The wear indicates the game was played and enjoyed and is important. The wood and metal parts of a game acquire a patina with use and age and I try to preserve this appearance.
Sometimes games have been played a lot. When a game gets old, operators stop taking care of the game and often abuse them. When they each the end of their apparently useful life, they are removed from the locations and discarded. They are frequently stored in poor conditions, as they have no further value. When extensively abused, the wear on the games is extreme and parts will need to be refinished. The decision to refinish parts is difficult to make and every attempt is made to avoid doing this and retain the original finish.
Restoration Process
I think most of the effort in restoring a game is cleaning. I spend hours at the kitchen sink, cleaning each individual part. I use an ultrasonic cleaner to get the original grease and gunk off. I also used abrasives, a wire wheel and wire brush to clean metal parts. Most often, I will use a sponge or toothbrush with cleanser to clean most parts. Some metal parts that have rust will be dipped in phosphoric acid. This removes the rust and leaves a thin layer of oxidized metal to protect from further rust or to provide a base for paint.
There is little work required to stabilize the cosmetics of this type of game. The ball does not bounce around the playfield extensively, but rather travels slowly down. Most of the wear is on the outside of the cabinet. Once cleaned of the dirt and grime accumulated over the last 70 years, will probably remain clean for another seventy years. Johnson's Paste Wax is the most frequently used preventative measure as waxing the cabinet and metal castings will clean off most of the dirt and will prevent further corrosion and rust.
The legs were badly worn and unevenly faded. The silver band around the bottom of each leg was badly worn from years of sweeping or mopping around them. The old finish, what is left of it, will have to be removed and a new finish applied. Applying wax will only make the poor condition more evident.
The game cabinet has a wonderful finish color and depth. While it has all the dents and scratches of an old game, the overall finish of the cabinet was good. Refinishing the cabinet would get rid of the marks but would also remove the depth of the patina. The contrast between refinished legs and retained old finish on the cabinet will need to be minimized.
Two games
The project started with two almost identical games. One was serial number 5620 and the other was 7722. The customer wanted one restored game, using the best parts from each game, and paid for the restoration by giving me the second game. Since both games were complete, this appeared to be a good arrangement.
I spent some time discussing the restoration with the customer, as I wanted to make sure his objectives were met. His vision for the final game was similar to mine, which was probably one good reason why he wanted me to do the restoration. He wanted a game that was not over restored but that appeared to be in exceptional condition. He wanted it completely cleaned and in good working condition.
I restored the customer's game first, before even starting on the other one. It was beneficial to have an assembled example when trying to assemble the game. While I took extensive pictures of both games, invariably I missed some of the details. The second game sitting next to the first as it was assembled helped. This article focuses on the restoration of 7722, but contains details about the first game, 5620, where they were different. I wanted to finish the first restoration quickly because the customer was waiting for it. This article was written as the second restoration progressed and was finished as 7722 was finished.
First, I evaluated the two games. I documented the differences and determined which parts in both games were in the best condition. I was surprised by the number of differences between two similar games. It was interesting to find many of the parts attached to the front casting were specific to the two games.
For example, the coin slide was badly worn in the first game, 5620. However, it was not possible to use the coin slide from 7722 because the size of the bezel matched the layout of the front casting. Since the coin slide could not be changed, the coin sort mechanism and the playfield itself could not be changed because they depended on the coin slide configuration! The playfield on game 7722 has a hole so the last coin played can be viewed and so needed to be in the same game as the front casting from 7722.
Once all the differences were determined and the condition of all the parts assessed, I described the best game possible to the customer. We discussed which game would provide the basis for his restoration and how I would proceed. The customer selected 5620 because it was older and because the cabinet was in better condition. It also has the front casting for the instruction card.
Later, I found other differences. One of the leg castings was an older design and did not match the others. Some of the leg bolt holes were ground down and some of the casting threads were stripped. There was only one coin door between the two games. The restoration of each game will provide its own challenges, but the results will hopefully be similar.
Disassemble
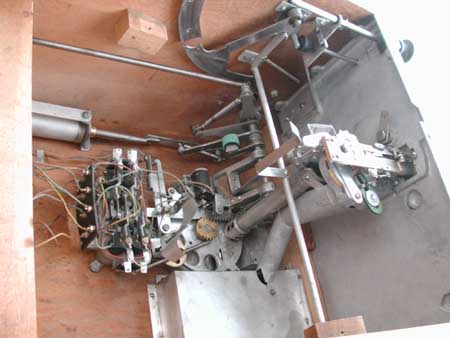
There are only three major assemblies in the game, the playfield, payout mechanism, and the front casting, which includes the coin slide. To remove the playfield, nine wires need to be disconnected from a terminal block and the screws removed from the hinges. The playfield can be set aside.
The front casting is removed to the front after the removal of four bolts in the side of the cabinet. The coin slide and coin rejecter are attached and come with the casting.
The payout lever is removed from the right side of the cabinet and the payout mechanism can be unbolted and lifted out.
The legs and leg castings are unbolted, leaving the cabinet bare. Each assembly is then disassembled individually and cleaned.
I document the game as I work on it. Documentation consists of notes, hand drawings, pictures, and patents. I draw assembly sequences, showing the order things come apart and hopefully go back together. Each assembly is placed in a box for later further documentation, disassembly, and cleaning.
I take pictures. I take pictures from every angle and lighting. I take sequence pictures. I place an assembly on the workbench and mount the camera on a tripod. I take a picture and then remove a couple of screws and a part. I place the screws to the side but pointing at the holes where they belong. Then I take another picture. I keep removing things, placing them around the assembly, and taking pictures. Later, when the sequence of pictures is reversed, they provide an assembly guide.
I keep track of the time I spend on each activity. I estimate how long it is going to take to do the various jobs in a restoration and document them as an estimate. Then, as the job progresses, I can check my estimates against the actual time required. I hope that my estimates will improve over time!
I took the time to convert the operator's manual to computer format. It is available in Adobe PDF format.
My final piece of documentation is an article like this. Perhaps some day, a historian in the future will come across my notes and will be better able to understand how something goes together or how something is supposed to work. I publish the articles on the Internet, making the notes available to other people doing similar restorations. Should I ever encounter a parts game, I have a better chance of restoring it completely if I have the extensive assembly notes.
Finally, I now animate mechanisms. I am using Internet technology to show how mechanisms actually work and move. For example, I have animated the working of the payout mechanism. I carefully take pictures of the mechanism as it moves. These pictures can be placed on a web page with buttons indicating each position. When the viewer moves the mouse over each button, the mechanism moves to the next position, almost like it is operating in the picture. An explanation is associated with each button, making it clear what is happening at each position. The animations help provide additional information about what goes on inside the game.
Mechanisms
Coin Slide: The coin slide accepts the coin, measures it for diameter and thickness, and rejects it if it is not correct. If the coin is correct, the coin slide resets the game and gets it ready for play. It also saves the coin and often makes it visible as further confirmation it is legal tender.
Rejecter or Separator: The rejecter moves the coin played previously past a magnet. If the token is magnetic, it is placed in the coin feed tube, to be fed to the payout mechanism. If the coin is not magnetic, like a nickel, it is dropped immediately into the coin box. It also strips any extra coins off the top of the coin feed tube and shoves them into the coin box, preventing a jam if the feed tube gets full.
The rejecter makes sure that tokens are paid out first before real money. This makes sure slugs are returned to the players that cheat and that payouts prizes need to be redeemed at a cashier, thus providing the establishment a better way of monitoring money flow. This also can prevent the appearance of gambling, as tokens do not have a value unless redeemed.
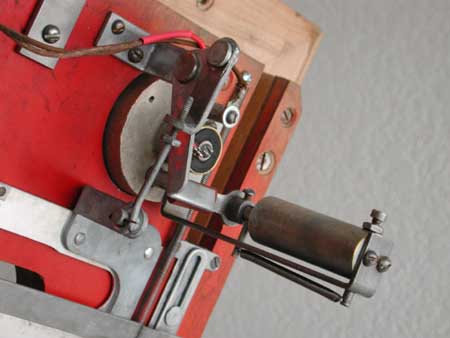
Payout Mechanism: The payout lever operates the payout mechanism, as the player pulls it. It determines if any prize is won, how many coins are to be paid, and trips the correct relay, preventing additional payouts for the same prize. The player supplies mechanical motion as he pulls the lever but the electronics control how much is paid out and insures multiple payouts do not happen.
Payout Lever: The payout lever is complicated as well. It needs to accommodate the player that pulls when no prize is deserved. It needs to allow a pull when a prize is deserved, but moderate the speed so as not to move the payout mechanism quickly. It needs to return slowly after payout out coins and it needs to allow the player to pull it back into position, but to do so slowly so as not to hurt the payout mechanism. It consists of a series of interconnected levers, springs, and a pneumatic damper.
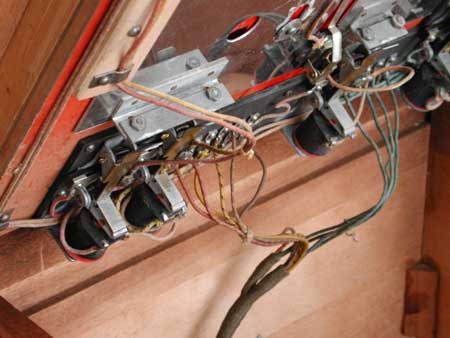
Above are the logic relays, one relay for each possible payout combination.
Playfield: The playfield consists of wood board, decorated and with holes and pin scattered around. Most holes have a lever activating a contact. When the game is reset, the levers are moved out of the way and the balls fall into a trough under the playfield. The trough feeds the balls to the lift mechanism. The reset motion also latches the payout relays at the bottom of the playfield.
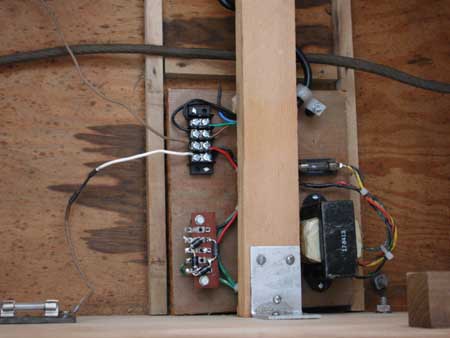
Power Supply: I replace d the old style batteries with a modern power supply. A transformer and diode bridge supplies 12 volts of direct current. The game originally required six lantern batteries. While the game has a feature, explained later, that prevents battery drain except when paying out, I felt it was better not to replace the acid containers with modern electronics. The power supply is locked into place using the existing battery hold down bar, so the game is not modified and can be returned to battery power if desired.
Tilt: The tilt mechanism is a ball on pedestal. It is placed there when the coin slide is pushed in, raising a cup and centering the ball. A damper slows the fall of the cup, gently depositing the ball on the pedestal. Should the ball fall, it unlatches a relay, opening a contact that supplies current to the payout mechanism and preventing any further payouts.
Cleaning and Polishing
When a game gets to be seventy years old, it acquires lots of dirt and grime. The finish on the cabinet was oxidized and clouded. Dirt was ground into the palm bar. The wiring was dirty and colors of the insulation were faded. The oil was caked with dirt and many mechanisms did not move and were jammed. The grease in the damper leather was hard and no longer flexible. Everything was covered with dust. A couple of tablespoons of dirt were found in the playfield. Rust and acid corrosion were everywhere.
The castings were cleaned first with soap and water and then polished with 0000 steel wool and a buffing wheel. The mechanisms were cleaned in the ultrasonic cleaner with ammoniated machine cleaning solution and then rinsed and dried. The hardware, nuts and bolts, were soaked in phosphoric acid and then rinsed and dried. The phosphoric acid leaves a protective layer, preventing further rust. Some metal parts are cleaned using a wire wheel and many of the threads are deburred with the wire wheel. The bright parts were buffed. The wood and playfield were cleaned and protected with paste wax, Johnson's being my favorite.
It was interesting to look at the original leg and front castings. The castings were not finished carefully and original cast marks were left in the hard to finish areas. For example, it was clear that the craftsman was right handed and worked with the buffing pad on the left of the machine. I polished the castings as they were originally and did not try to improve upon their work.
The paint in the front casting was faded and was flaking off. I removed it, polished the casting with 0000 steel wool, which provides with a shine almost like original. I repainted the black and red areas and preserved them with a coat of urethane. The excess paint is easily removed by careful use of more steel wool.
One of the leg castings was cracked and a bolt tab broken off. It is possible to silver solder the pieces together, but the pressure of the bolt will break it again. I chose to bolt the broken tab on, giving the appearance of a complete casting even though the crack is evident. The game legs will be strong enough for home use. Reproducing the casting will be difficult but will this will be necessary if the game is placed in an arcade.
All buffed metal parts were waxed carefully to delay further tarnishing.
The legs were severely discolored, mostly from getting wet and from being banged together during transportation. Much of the original finish was missing and even the silver bands at the bottom were worn off. The legs were refinished by sanding down the original finish, staining with a stain that will match the cabinet, and then a coat of urethane to protect them in the future. The silver band was not reproduced but can be added if the new owner desires.
The cabinet finish was also in very poor condition. It was faded unevenly, missing in many places, and clouded. The top of the old finish was sanded off but the surface imperfections were not removed and bottom layer left intact. Then a coat of urethane was added, retaining and protecting the original patina. The art Deco grooves were repainted.
The missing coin door was duplicated in Alder wood. It was cut to the correct size and a hole for the lock was cut. By experimenting with several different stains, a combination of two was found to duplicate the original finish. The depth of the original finish could not be duplicated however, and if you look closely, you can see the door is not original. Grooves were routed using a rotary tool mounted in a drill press. The original lock was recessed in a cone depression in the wood. This could not be duplicated easily and so the lock was mounted on the surface of the wood.
Assembly
It is actually fun putting clean parts back together! The assembly process is easier with clean parts and you can see how things went together originally because the wear patterns in the metal and wood. Nuts and bolts go together without excessive pressure and things fit.
Clean assemblies also work better, which should not be a surprise. A fresh coat of oil in the correct places restores most mechanisms to original working order. Occasionally there are problems where extreme wear has caused excessive clearances. Shims are added where needed, in this case inside the payout mechanism.
There is a pneumatic damper under the tilt pedestal to keep the ball from falling off during reset.
Some springs were over tightened by operators that were trying to make sluggish mechanisms work again. Operators do not take the time to disassemble, clean and reassemble, especially as the game gets old and is about to be retired. Oil is not normally used in modern pinball machines because it attracts dirt. In older machines, those without flippers or rubber rings, oil is not a problem and a thin film of oil between sliding parts is specified.
Figuring out how originally worked
Patents provide a wealth of information on old games. The designer is required to describe the game fully and explain how it works. Often schematics and other mechanical drawings are included. The designer also describes the functioning of the game step-by-step, with explanations about why it was designed a certain way. All of this helps.
The leg castings and legs were installed on to the cabinet. The leg that attaches near the coin box has flush fasteners on the inside rather than the normal nuts. This provides a smooth interior in which to slide the coin box. One fastener was not usable because of extreme corrosion and was not replaced.
Next, all the contents in the bottom of the cabinet are installed. The coin box housing, payout mechanism, levers and the coin feed tubes are installed. The payout mechanism has a couple of rubber dampers on the levers. These are replaced with rings cut from sections of rubber irrigation hose.
The ball lift and ball guide are installed. The ball lift requires a rubber bumper at both ends of travel. The 3/8-inch toilet water supply compression joint, made out of rubber, is a perfect size to replace the dried out original.
The original wiring harness is attached and connected to the payout mechanism. The power supply is fabricated out of a transformer and a diode bridge, and locked under the battery lock down bar. Unfortunately a hole is needed in the bottom of the cabinet to feed in the power cord.
While the operation of the game from a player's perspective is easy to determine, the operation inside the cabinet is not. The manual does not help with a description of the sequence of operations. Some of the mechanism adjustments need to be made after viewing the game in operation. For example, the clearances for many of the relay arms and the contacts on the hole levers need to be achieved by experimentation. If it does not work, the mechanism needs to be examined while operating and the clearance modified to make sure it works the next time.
I take many pictures during the restoration of a game. The first set documents the condition of the game before starting and shows how various assemblies are put together. Sometimes the assembly is not put together correctly or something was broken and is the reason the game was removed from location and stored. It did not work any more! These pictures also show the location of assemblies and parts.
The second set of pictures is taken during disassembly. They show the sequence of parts being taken off a mechanism, their size, and condition. Careful photography even shows the number of threads in a bolt in a particular position. Often parts are custom made for specific applications and standardized lengths will not work. Printing the pictures in reverse order provide an assembly manual for the mechanism. Should I ever encounter a game that is a jumble of parts in boxes, already disassembled, I will be able to put it all together again with the help of these pictures.
Next I take pictures of the individual mechanisms actually operating, see the next section on animations.
Finally, I take a series of pictures of the restored game. These document the final condition and working condition of the various parts. I take overall pictures to show the game's appearance and I take detailed pictures of various assemblies to show how it all goes together. I even take publicity pictures for articles like this one, for placement on the web and in magazines.
Animations
Once a mechanism has been restored, I try to document how it works. The presentation of information on the web provides an interesting opportunity to use modern technology not available in books or other printed material. By carefully sequencing pictures, the mechanism can appear to move and operate, and stop when the person viewing the animation wants additional information.
The pictures needed to accomplish this are difficult to obtain. The camera and mechanism cannot move from picture to picture. The camera needs to be stabilized on a tripod, the lighting needs to be consistent, and the mechanism needs to remain still, except for its operation.
The animations are accomplished by taking succeeding pictures of the operation and then superimposing them on top of each other on a web page. The person viewing the animation can then move the cursor across the numbered trigger points, which causes the computer to change the picture. The appearance is that of the mechanism moving.
I created animations of the coin slide, coin rejecter mechanism, and the payout. These can be found on The Sands Mechanical Museum web site, http://www.sandsmuseum.com.
Adjustments
The game required some adjustments in order to make it play correctly. Each game is different and some adjustments may have just happened correctly during assembly. These are not mentioned. Other things do not work for one reason or another and adjustments need to be made.
The coin slide resets the entire game. The player pushing on the coin slide provides the energy to move various mechanisms into their starting positions. The holes under the balls need to open up and allow all the balls to accumulate in the bottom of the game. This also causes all the logic relays indicating which combinations paid out previously to be reset. The slide also powers the coin rejecter, sorting the tokens into the payout tube and the real money into the coin box. The tilt indicator is raised, centering the tilt ball on the pedestal.
All this requires a strong push by the player and all actions need to be carefully aligned. The slide allows only so much movement and so all actions need to be finished by the time the slide is fully extended.
The payout mechanism slices three nickels out of the payout tube. The depth of the slicer needs to be exactly as deep as three nickels are tall. There are small shims on the plate that covers the slicer disk and these need to installed correctly to prevent the payout disk from jamming.
Players may try to manipulate the payout lever to obtain more coins. They may try to move it faster or slower than the mechanism can handle. The clock is an air governor and it limits the speed of the payout disk. The clock is a fan that spins only so fast, limiting the speed of the payout. No matter how quickly the player pulls the lever, a series of springs continues to power the payout cycle and clock.
The relays under the playfield determine which amounts have been paid and these need careful adjustment. There is one relay for each combination. Once paid, the relay trips and opens contacts, preventing a duplicate payout. The coin slide moves the ball drop plate, which in turn resets any relays. If not correctly adjusted, the player will not get paid and will leave.
The ball lift and shooter are attached to the front casting. The front casting is attached to the cabinet and the playfield rests on the cabinet. The alignment of the shooter needs to be carefully adjusted so that the ball is struck in its center. This also prevents wear and improves the player' s control of the ball shot.
Testing
The game is finally assembled and is ready to play! The kids are excited and continue to pester me until they are allowed to shoot a ball or two. Then they want to play a game, and finally they are not satisfied until they have achieved every combination.
This provides a good opportunity to test the game. Not only can each combination be verified and the payout validated, but also enough play can be accumulated to work out any problems. While a game will often start playing correctly, a loose screw or incorrectly assembled mechanism will cause it to fail later. It is best to catch these problems before delivering the game to the customer.
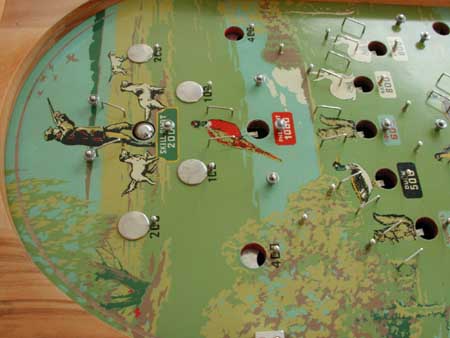
Note the holes blocked off with percentaging buttons. Four are supplied with each game.
The game is difficult enough to play and especially difficult to win, that testing is best accomplished with the glass off the playfield. This way all possible combinations and payouts can be provoked quickly and amounts validated.
Summary
Gambling machine
Jennings Sportsman is a gambling machine and is a variation of a slot machine. Comparing it to a modern pinball is not possible because it does not have flippers and does not have a way of keeping the balls moving. The player quickly shoots ten balls and pulls the lever every time a combination is made much like a slot machine. The objective is gambling, getting more money back than you paid in.
There is one skill shot and the player can nudge the game to encourage the ball to enter desired holes. However, hole placement makes it doubtful that even a skilled player will walk away with more money than when they started.
This game is unusual compared to pinballs because it does payout coins!
Bibliography
Bueschel, Richard M.; Pinball 1, Illustrated Historical Guide to Pinball Machines, Volume 1; Hoflin Publishing Ltd; 1988
Manual
The manual has been converted to pdf and is available for downloading. It is about 2 mb.
Thanks
I want to thank Ken Nerlove for letting me restore his game and for providing advice. Thanks also go to Dustin and Ryan for encouragement, testing, and scrounging nickels, and to my wife for the web animation technology and ideas. The members of the pinball Internet community also provided information on the many techniques I use during the restoration process.