
How to assemble an animal:
Turn off the power before doing any work on your game. The games do not have a modern ground and have over 300 volts direct current in the amplifier! You can assemble either the bear or the dog or both.
Replacing the Bear:

- see how to loosen the top track
- place bottom wheels on rail of bottom track
- gently slip the top rail under the fingers, as shown by top blue arrow, but over the pins on the guides at the top of the carriage and guide, shown by the top yellow arrows and green arrow. The fingers should catch the bumps on the top of the top rail. It may be easier to remove the fingers until the carriage is mounted on the track.
- tighten the six screws on the top of the track.
- replace the chain follower on top of the sprocket.
- replace or tighten the screws that locate the fingers, as shown where the blue arrows are. CAREFUL! These fingers are easily bent and their adjustment is critical to the bear turning the opposite way. Tighten the mounting screws slowly, making sure the fingers move freely the entire time. They can be easily jiggled into position. They follow a cam at the base of the bear.
Replacing the Dog:
- loosen track
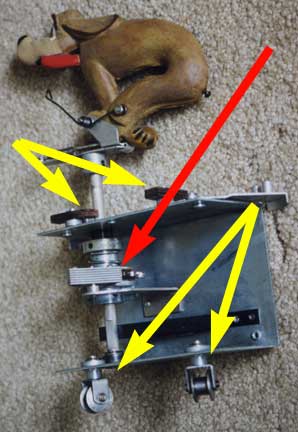
- put wheels on the bottom rail and tilt the carriage upright. Wheels are at bottom yellow arrows.
- make sure the fiber followers are tucked under the top rail, as shown by the upper arrows.
- reattach the chain follower over the sprocket, as shown by the red arrow.
Replace the Scenery:
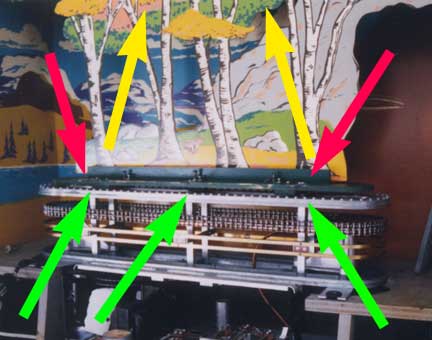
- tighten the six machine screws that hold the top of the track to the framework, as shown by the bottom green arrows
- add the four machine screws that hold the green ground to the metal track, as shown by the red arrows.
- add the two wood screws that hold the center scenery to the top. The yellow arrows are pointing to their general location. Sometimes the scenery is also attached to the green wood plate at the bottom and these should be replaced as well.