
High Speed Restoration
June 4, 2001
- Part One
- Introduction
- Project History and Philosophy
- Strategy
- Who, Where, and When
- Stages
- Research and Evaluation
- Dismanteling the Old
- Cleaning
- Part Two
- Playfield Restoration
- Playfield Swap
- Top of the Playfield
- Steel Fences
- Plastics
- Ramps, Spinners and Wire Trails
- Part Three
- Bottom of the Playfield
- Wiring and the Cabinet Head
- CPU Swap
- Modifications
- Cabinet
- Assembly
- Game Play
- Summary
Playfield Restoration
New playfields vary greatly in condition. They can be rejects from the factory, they can be new-old-stock replacements, or anything in between. You should check the bottom as well as the top when considering a replacement.
I examined the paint alignment marks at the corners of the playfield. These indicate how accurately the screens were aligned prior to painting. I also looked at the artwork and how it is aligned with the lamp inserts and various cuts in the wood. Missalignement here can have implications in game play because the location of various parts will be affected.
My replacement playfield was punched, meaning the location of the screws and mounting hardware were poked with a sharp nail. Screws can be driven easily without pilot holes. The locations of T-nuts were counter sunk in the wood but no T-nuts existed.
First, I researched the Internet for ideas on clear coating the playfield. As mentioned before I decided to use polyurethane, specifically Diamond Finish from Flecto.
I cleaned off the playfield with naptha to remove grease, wax, or other contaminants that might have accumulated over the years of storage and handling. I sanded the playfield with 600 grit to remove the gloss and give the verathane purchase. I then applied six coats. Each coat consists of a thin spray of verathane, 24 hours to dry, and a quick sand to prepare for the next coat. The final coat was heavier, adding gloss. Portions of the final coat were touched up with sanding with progressively finer grit, starting at 600 and ending with 1200, in order to make it completely smooth.
Finally, a couple of coats of Johnson's paste wax were applied, although there was some difficulty getting it to stick on the slippery polyurethane.
T-nuts were added in the correct locations and the playfield was ready for the swap. Some of the holes in the top of the playfield, the location of various posts, were not previously drilled. I decided to finish some of these later, after adding the various plastics and devices. I could make sure the locations were accurate relative to these parts. Some of the holes could be drilled now because their location was relative to holes already in the playfiled. For example, some were posts located relative to the targets. Since the target locations were already determined by the holes punched in the bottom, the posts could also be placed, and the hole locations determined.
Adding the T-nuts took a lot more time than I expected. This was detail work and required careful planning. Drilling a new playfield is dangerous with a mistake resulting in a hole in the middle of the area of play. I needed to determine the correct hole location and then needed to drill it a size larger to accomodate the threaded section of the T. It helped tremendously to have the other playfield available to check the location of various parts. There were even significant differences between all three playfields and it was obvious the factory made changes as the game progressed through its manufacturing run.
Finally, the screw holes for the side rails needed to be drilled. While I was not ready to attach them, later access would be hindered by all the wiring. This was one of the more difficult tasks as there were no landmarks to guide the holes. The rails are less than half an inch wide and can be split if the hole is not centered. I placed the side rail next to where it was to be located and spaced the holes according to the holes already in the rail. I used a straight edge to line up the holes. By carefully measuring twice and cutting once, I managed to use the holes already located in the rails. These holes also need to be countersunk which can be accomplished by using an oversize drill bit and only drilling a tiny bit.
Playfield Swap
Each playfield swap has a story. A swap is not to be taken lightly. Mine was no exception. As mentioned before, all the components and parts were removed from both sides of the old playfield. There were still some problems before starting assembly of the new playfield.
Some of the general illumination lamp sockets are stapled. These need to be carefully pried loose with a flat blade or even cut with a cutoff wheel on the rotary tool. In some places wires were soldered to screws, making them difficult to remove.
I solder the barrel of the lamp socket to the socket bracket. Over time, with many lamp insertions, the rivet portion of the socket loosens and the lights start to flicker. Soldering the joint keeps the barrrel from rotating and keeps the lamps bright.
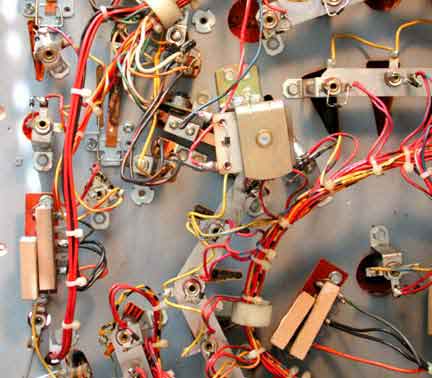
Now everything was loose on the playfield, lying in position. The remaining challenge was the general illumination lights and their bare wiring. The wiring is stapled to the bottom of the playfield and is difficult to access. Even the lamp sockets are stapled in place. The wiring and lamp sockets are placed on the playfield first and need to be the last thing removed. I decided to remove the sockets and staple them in their new home and complete the wiring later, using insulated wiring if needed. I was worried about routing the bare wires away from all the other things on the bottom and did not want any shorts. Using insulated wiring would give me flexibility in running the wires away from various moving things.
Finally I asked my wife and kids to help with the fun part. We all grabbed a couple of handfulls of wire and carefully picked up the harness and moved it over to the new playfield. I started driving all the 1/4 inch hex head screws I could find. By using muscle power, I avoided over driving them, and got some exercise as well. This also went quickly, taking much less time than I expected. I needed to be careful when driving a screw. Some of the screws were shorther and were used to secure thin sheet metal. Other screws were a bit longer and were used to mount the thicker metal legs of the powered devices. Mixing the two sizes could result in a longer screw punching through to the good side of the playfield.
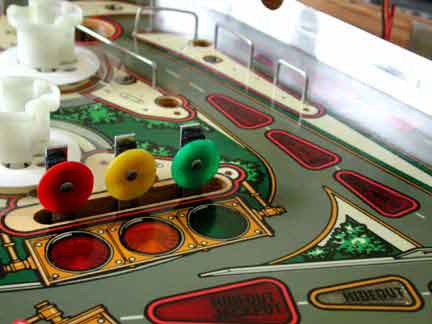
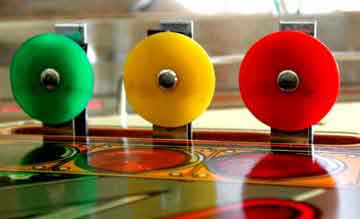
I managed to put all the lamp sockets back under their respective lamp inserts, all except one! Later, when first playing the game, I found one three lamp arch had been swapped end for end, with the resulting red, yellow, and green lights reversed. It was very confusing until I realized what was wrong and quickly turned the arch around.
The general illumination circuits needed to be completed. Since I was not replacing the bare wiring stapled to the bottom of the playfield, I decided to use colored, insulated wire instead. Access was difficult. I also replace the staples holding the sockets with screws as they hold better when inserting lamps.
Now all I had to do was attach all the wiring and install all the mechanisms. I had cleaned everthing up and it was all ready in boxes. This step, while expecting it to take a long time, went quickly.
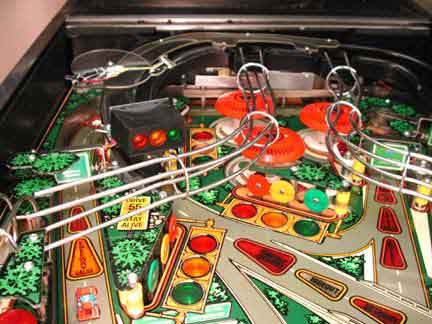
Top of the Playfield
Populating the top of the playfield was the most difficult task of the entire restoration! I believe every time the game gets cleaned and shopped, every time a part breaks, and every time a new person touches the game, a modification can occur. The game never gets put back together the same way it left the factory and maybe the factory even made changes during a production run.
Another of my goals during a restoration is to stablize the game. That means all areas subject to wear are provided with protection, all possible pieces that might break when attacked by the ball are protected, and all cosmetics are preserved.
So far, the art and graphics on the playfield are protected by a coat of polyurethane. Now ramps, plastics, and targets need to get some kind of protection.
I also try to protect the ball. You might ask why the ball needs protection? A worn pinball acts like sandpaper inside your game. The little nicks and scratches in the ball, especially when it is spinning, abrade the surface of the playfield and the various posts and rubber rings. The rings are easy to replace but the playfield is not. I replace the balls every time I clean and shop a game. I also work to set up the game so the ball is not nicked and scratched in the first place. I try to reduce the metal-to-metal contact and where contact is inevitable, I triy to make sure it is one smooth surface against another. For example, I polish the pop bumper rings. I will illustrate other examples as the pieces are installed.
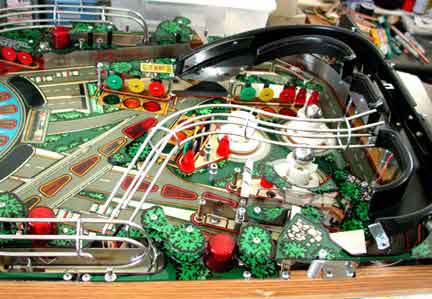
During disassembly, I divided the old playfield into six sections, three on the left and three on the right. The goal was to add all the components to the top of the playfield, in the same locations as the designers intended, and to add protective modifications where necessary. I needed to put it all back like it was and make any of my modifications subtle enough so as not to distract from the original intention and construction. I used to have a basket of parts left over after working on a game. Now, if there is a part left over in a tray, I know it belongs in a much smaller area, one sixth of the playfield.
Steel Fences
I clean metal fences with cleanser. Phosphoric acid, steel wool, and the parts tumbler are only used when extreme corrosion is found, as for example on much older machines. The aggressive cleaning methods have their own problems when neutralizing the remaining residue. For example, any tiny bit of steel wool left on a part can cause havoc with the electrical circuitry of a game. These shorts are very difficult to find and can happen at any time, long after you finished putting the game back together. Cleanser easily rinses away if careful attention is paid. The fence appears clean, having the light layer of corrsion removed and the ball tracking on the side is blended in with the original texture of the part. I use a tooth brushes to get in the nooks and crannies. I also dry every washed part with paper towels, preventing water spots and resulting in additional shine.
The locations of the steel fences are critical to the game play. The designers allowed for this in the construction of the fence by slotting the mounting holes at critical locations. I took care when drilling the holes mounting the fences, to make sure the curve of the fence and the exit direction of the ball were correct. If this is done correctly, the game will play with a rythem not often seen in a game on location.
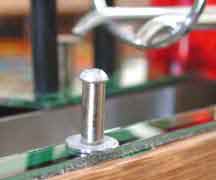
The side rails were reattached and the wear points protected with small pieces of self-sticking Mylar. The wire guide holes were drilled after carefully locating their positions and the guides pounded in with a block of wood. I applied some wood glue to the holes prior to inserting the guides. This helps set the depth and the guide can be removed later and inserted again to the same depth.
Plastics
New lamps are inserted into the general illumination sockets before installing the plastics that cover them.
The old plastics were in exceptionally good condition. Some were warped a bit, as normal, and the graphics were worn off in little places. This was caused by a metal part under the plastic rubbing the graphics. Normally I would clean the plastic parts with non-abrasive dish soap and then dry gently with a soft cloth. This returns the plastic to its original shine. However I had a new set and so I set the old ones aside as examples on how to assemble the new.
Installing the plastics presents a new set of challenges. Plastics seem to want to bend and sway after installation. Clamping a screw on them adds stress that eventually causes additional bending. With the new plastics, I installed them carefully, never completely tightening the screw or nut that holds them in place. I use Nyloc nuts and do not completely tighten them.
I also put a clear Lexan washer under the plastic in places where the ball might come and hit the post holding the plastic, like around the sling shots. This high impact, plastic washer protects the decorative plastic from damage by the ball.
Locating where the plastics go requires some detective work. I looked to see where it fits, with the holes lining up with various posts. Some of the decorative plastics mount to other plastics and mount with only a single bolt. In many cases you can examine the plastic part number, printed in the graphics, and because of the sequence, determine its association with other plastics in the number order. Many of the trees look identical but are not. Careful detective work makes sure the correct ones are combined.
Some of the plastics are multilevel and have a long rivet-like spacer to hold them apart. I grind off the crimp portion of the rivet so that the spacer can be used with the new plastics. Now however, a nut and bolt will be needed to keep the layers in place.
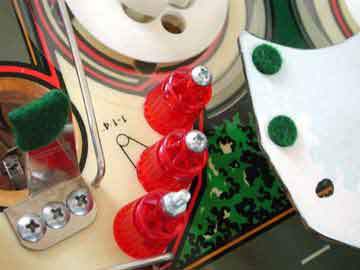
I install small felt dots in places where the graphics on the bottom of the plastic might rub on something. Often there is a post or other obstruction under a plastic and wear on the original plastic graphics is evident. By placing a small felt dot in the correct place, this wear can be prevented. The dot needs to be small or it will cause a shadow from the general illumination under the plastic. I prefer to attach the dot to the bottom of the plastic but it works applied to the top of the offending post as well.
I also wax the plastics as it makes later cleaning easier.
I found where all the plastics were supposed to go except for the helicopter! I asked the helpful rec.games.pinball group for suggestions and received five different answers. I placed it in the upper left corner, where the vegetation seemed sparse enough to give the pilot room to maneuver.
Ramps, Spinners and Wire Trails
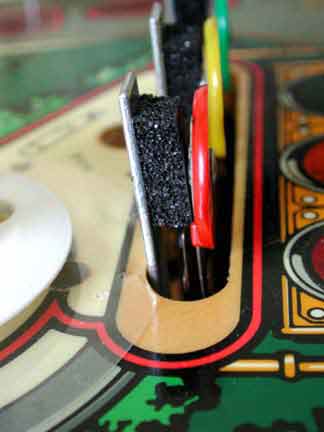
Ramp entrances need a lot of attention, especially because the plastic takes a lot of abuse from the ball battering its way into the ramp before sliding gently along the side. The entrance to the High Speed ramp is protected by a couple of posts. This generally prevents the sides from cracking. Game play is improved if the ball does not get launched upon entering the ramp. I placed high density foam under the spring steel entrance, which absorbs the initial impact of the ball starting up the ramp. This is done on modern games but was not done on High Speed
.
There are some posts, consisting of a longer screw and a cylindrical spacer, strategically placed to stop the ball or prevent it from resting on top of the plastics. There are a couple where the wire trails dump the ball into the left and right hide outs. These need to be carefully placed so the ball does not have a spot to rest out of play. I believe these were post-production parts and they can be left off, leaving the plastics without holes. Again, in a home environment, it is easy to get the key, pull the glass, and release the stuck ball. I decided to replace them and keep the game as if it were happily on location.
I forgot to put the bumper caps on and had to disassemble the entire ramp to gain access again. I do this a lot, assembling something for fit and then having to remove it all to fix another problem or install something I forgot.
Putting wiring and switches in the hideouts, attaching the wiring for the stop light at the entrance to the ramp and attaching the wiring to the switches on the ramp all required manual dexterity. I worked to keep the wiring away from the lamps and other wear points.
I added a couple of coats of wax to the ramp. The ramp diverters required careful assembly. The shock absorbing spring that attaches the lever to the solenoid itself is a weak link and is often found broken on games. The diverter needs the correct spacers and adjustment to move freely. This is one of the few places where the manual calls for lubrication. Oil will attract all the dirt and particles from the rubber rings and clog most mechanisms. I carefully apply machine oil to the moving pivots and wipe off the excess, hoping to minimize the amount of oil exposed to dirt.
It was during the installation of the wire exit trails from the left and right hideouts that I found problems with the alignment of the pre-drilled holes in the playfield. The holes to mount the ramps needed to be moved over a bit less than 1/16 of an inch. The left ramp also stickup up just enough to touch the playfield glass, causing an annoying rattle during play. Aiming the exit of the ramp is important to prevent those straight-down-the-middle exits.
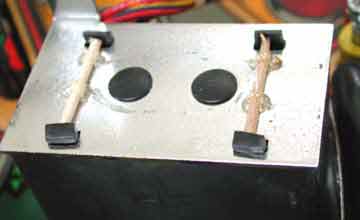
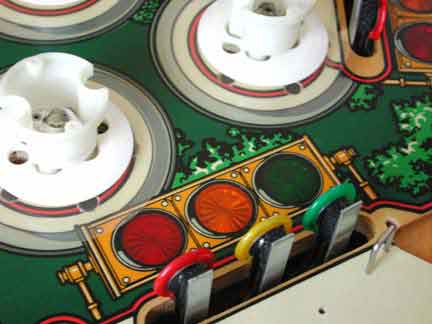
The heat of the lamps in the traffic light tend to warp the housing. The tabs in the back shrink and allow the black box with traffic lenses to fall off. I spread the tabs with a couple of tooth picks broken to size and secured them with a dab of hot glue. I prefer this to the normal operator solution of attaching the box with pieces of black plastic tape.
One of the joys of owning your own machine is the ability to tune it for play. I believe Steve Richie, the designer of the game, wanted fluid play both feeding the flippers, and making continuous loops. It is great to make the left or right loop, feeding it back to the same flipper, and making the loop again, repeatedly. Placement of the steel fences, alignment of the exit point of the fence, alignment of the hideout exits to feed and start the loop, and good flipper action all make for continuous loops.
One of the problems with the location of the fences is the lack of protection for the end of the fence. The old fences showed a dent in the end where a poorly aimed shot hits the end of the metal head on. This dents the end of the fence and puts a nick in the ball. In trying to preserve the appearance and play of the game, I tried to prevent this damage. On the left side fence, near the row of targets, I tried putting a post with a rubber ring tight up against the fence. The ball would hit the rubber and spare the fence. This was a good idea but a bad solution. In play, when the ball makes the loop starting on the right side, the ball will come around the left fence, and just at the exit, would get a slight bump from the bit of rubber ring hanging over the end. While protecting the fence end, it would give a slight kick towards the right, missing the left flipper and destroying the fluid play. I moved the post back slightly. The end of the fence is still in danger but the number of shots actually hitting it with any force is greatly reduced.
The three spinners at the entrances to the loop and capture hole were well worn, even the ones on the parts game. I decided to reproduce the graphics stickers. They were scanned into the computer and the images fixed. I printed them on normal paper and cut them out. They were glued on to the now cleaned metal spinner and covered with several coats of polyurethane. While not original, they are not showing any wear after lots of play.
I adjusted the aim of the left and right loop exits, and the plunger shot, to make sure the ball goes up the ramp efficiently.
Finally I did a quality check of the whole playfield! This involves a careful look at each wire, to make sure there are no loose ones. I examined each solenoid solder joint to make sure the solder was shiny and gave the wire a tug to make sure it was mechanically sound. These get a lot of shock loads and will be the first thing to break. I measured each diode and flash resistor to make sure they were correct and also checked each fuse to make sure the rating was correct. Switch clearances were checked and each mechanism was moved through its range of motion, checking for any binding or excessive play. My goal was to have the game power up and run, first time! The quality checklist sign off tag was mounted on the bottom of the playfield and was blank because the play field was new. I happily signed my initials! That should give some future historian fits when they find "mas" instead of the expected initials from the assembly line.
Modern games have a shock absorbing piece of foam behind the targets. These reduce the shock to the target back and cushion the blow to the front plastic target. I placed new foam behind all the targets. Note also the Mylar disc protecting the area immediately around the pop bumper. It needed to be notched slightly to clear the back of the target.